Shooting Into the Sun: Sunstars, Flare, and Silhouettes at Sunset
How to point your lens straight at a low sun and come away with a clean sunstar, controlled flare, and a deliberate silhouette instead of a blown out mess.
Shooting Into the Sun: Sunstars, Flare, and Silhouettes at Sunset
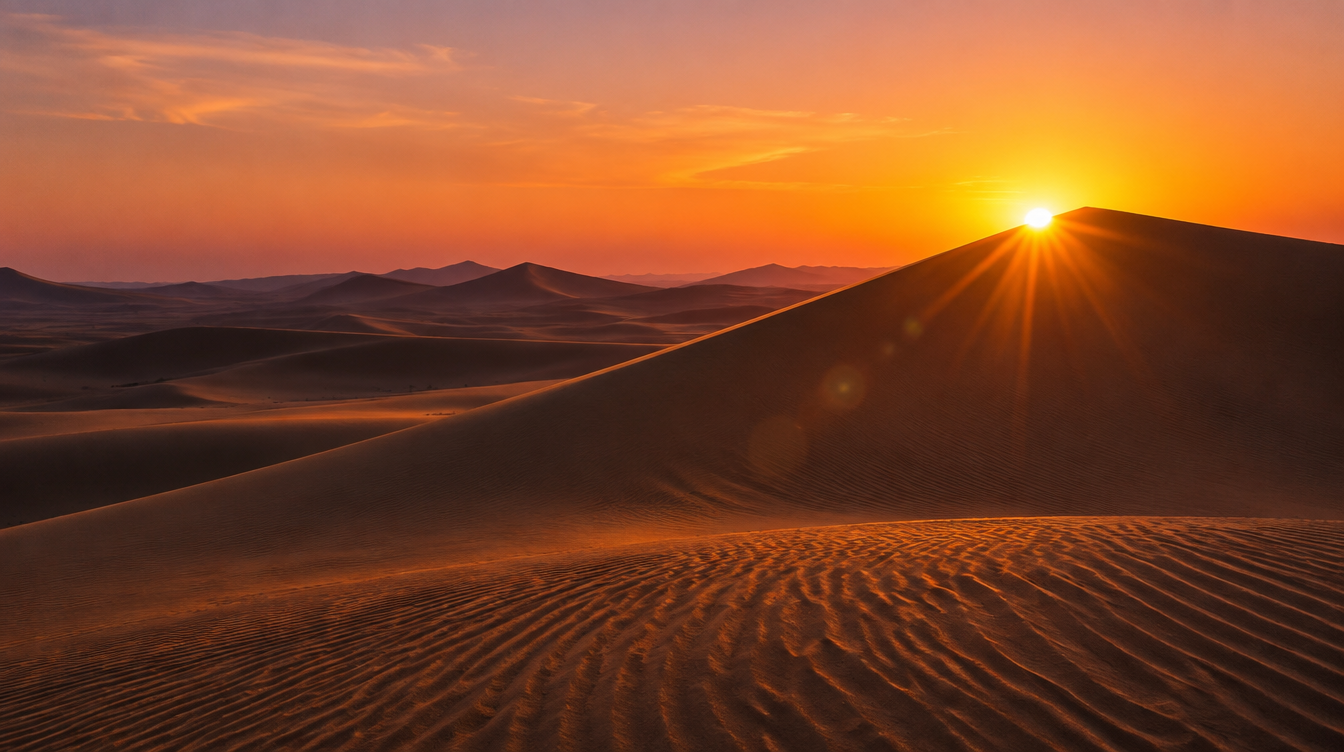
For years I avoided pointing a lens directly at the sun. Every beginner gets told the same thing: meter for the scene, keep the sun out of frame, come back at golden hour when the light is soft and forgiving. Then I spent a week guiding a group across dune ridges in the Sahara, watching the sun drop straight behind a line of rippled sand, and I realized that avoiding the sun was costing us the single best shot of the trip. Shooting straight into it is not a mistake to correct. It is a different skill with its own settings, its own failure modes, and its own reward when you get it right.
This guide covers the three things that go wrong, or go right, the moment the sun enters your frame. Getting a clean, pointed sunstar instead of a blown out blob. Controlling lens flare instead of losing contrast across the whole image. Exposing for a silhouette on purpose instead of fighting a scene your sensor was never going to capture in one frame anyway. They are three separate problems, but they all come from the same decision to aim your lens somewhere most photographers are taught to avoid.
Key Takeaways
Shooting into the sun rewards deliberate choices about aperture, blocking, and metering, not luck. This table is the fast version of everything below.
| Point | Details |
|---|---|
| Sunstar aperture range | f/11 to f/22, with the pointed star getting sharper as you stop down, at the cost of overall diffraction softening past roughly f/16-f/22 |
| How to avoid a blown out white blob | Let only a sliver of the sun's disc peek past a dune ridge, horizon line, or rock rather than exposing the full disc |
| Lens hoods and in-frame flare | A hood blocks light from outside the frame; it does almost nothing once the sun itself is inside your composition |
| Clean silhouette benchmark | A brightness ratio of roughly 16:1 or greater between background and subject |
| When to bracket instead of shoot one frame | Whenever your histogram clips the sun or sky and the foreground at the same time |
| Best practice ground | Open desert horizons, where dune ridges give precise control over how much sun you block and the sky-to-sand contrast is extreme |
Table of Contents
- How a sunstar is actually formed
- Dialing in a clean sunstar
- Lens flare: control it or use it
- Exposing for a silhouette on purpose
- When one frame is not enough: bracketing and blending
- Why open desert horizons are the best practice ground
- A field checklist for shooting into the sun
- Frequently asked questions
How a sunstar is actually formed
A sunstar is not a lens trick or a filter effect. It is diffraction, the same physics that governs how light bends around any obstacle, happening at the edges of your aperture's diaphragm blades. As Wikipedia's entry on diffraction puts it, light deviates "from straight-line propagation due to an obstacle or through an aperture," and "the smaller the opening, the more pronounced this effect becomes." Stop your lens down and you are shrinking that opening, which bends more light around the blade edges and produces the pointed rays you see radiating from a bright point source.
The number of points you get is not random. It comes directly from how many blades make up your diaphragm. According to Wikipedia's article on the diaphragm, "for an odd number of blades, there are twice as many spikes as there are blades," while "with even blade counts, the two spikes per blade will overlap each other, so the number of spikes visible will be the number of blades." A 9-bladed aperture, common on many primes, gives you 18 points. An 8-bladed aperture gives you 8. Most modern lenses use somewhere between five and ten blades, and the blade shape matters too: straight blades cut a polygonal opening that produces crisp, defined points, while the curved blades many zooms use to smooth out out-of-focus backgrounds also round off the points of your sunstar.
| Blade count | Blade shape | Sunstar points |
|---|---|---|
| 5 (odd) | Straight | 10, well-defined |
| 7 (odd) | Straight | 14, well-defined |
| 9 (odd) | Straight | 18, well-defined |
| 6 (even) | Straight | 6, bolder but fewer points |
| 8 (even) | Straight | 8, bolder but fewer points |
| Any count | Rounded/curved | Softer, less distinct points, favors smoother bokeh instead |
This same diaphragm shape shows up again in a lens's bokeh and in its flare pattern. The diaphragm entry notes that out-of-focus points of light "appear as polygons with the same number of sides as the aperture has blades," which is exactly why a lens built for pointed sunstars tends to have slightly busier, more geometric bokeh than one built for creamy backgrounds. You are not choosing a better or worse lens. You are choosing which trade-off matters more for the shot in front of you.
Pro Tip: If you shoot the same scene at f/8 and f/16 and compare the sun, the difference in star definition is dramatic. Shoot a quick test at your own kit lens's widest and narrowest useful apertures before you travel, so you know exactly what your specific lens gives you rather than guessing in the field.
Dialing in a clean sunstar
In practice, I work in the f/11 to f/22 range depending on the lens, starting narrower and chimping the result rather than committing to one number. The star gets more defined as you stop down because the diffraction effect strengthens, but every lens also has a point where that same diffraction starts softening detail across the rest of the frame rather than just at the sun. That point, often called the diffraction-limited aperture, usually falls somewhere between f/16 and f/22 on a full frame body and a touch wider on smaller sensors. For a single hero frame with the sun as the subject, I will happily accept that overall softening. For a wider scene where sharp foreground detail matters just as much as the star, I back off toward f/11 or f/13 and accept a slightly less dramatic burst in exchange for a sharper frame overall.
The other half of a clean sunstar has nothing to do with aperture. It is about how much of the sun's disc is actually visible. A fully exposed sun, even stopped down hard, tends to blow out into a flat white circle with weak, washed out points because there is simply too much raw light hitting the sensor at once. The classic fix, and the one I use on almost every dune or ridge line shot, is to let only a sliver of the disc peek past something solid: a dune crest, a rooftop, a tree branch, the horizon itself as the sun sinks the last few degrees. That partial obstruction cuts the total light enough for the diffraction spikes to actually register instead of drowning in overexposure, and it is the single biggest difference between a forgettable white blob and a genuinely sharp sunstar.
Timing this well pairs naturally with understanding how light behaves in the hour around sunrise and sunset generally. If you have not already, it is worth reading our guide to photographing a sunrise, which walks through the same low sun angle from the opposite end of the day and covers the minute by minute changes in color and intensity that also apply here in reverse.
Lens flare: control it or use it
Flare happens for a simple reason. Wikipedia's entry on lens flare explains that it "occurs when light scattering... happens through internal reflections and forward scatter from imperfections in lens materials," meaning stray light bounces around between glass elements before it reaches the sensor instead of traveling straight through. Modern lenses use "anti-reflective coatings... to reduce lens flare," and those coatings have genuinely improved flare resistance over the decades, but the same entry notes they cannot eliminate it entirely, and interestingly, "if the lens has a 6-bladed aperture, the flare may have a hexagonal pattern," meaning your diaphragm shape influences flare just as much as it influences your sunstar.
Here is the gap almost every quick tutorial skips. The standard advice for flare is "use a lens hood," and that is good advice for the other 95 percent of your shooting, when a bright light source is just outside your composition sneaking in at an angle. The moment the sun itself is inside your frame, which is the entire subject of this article, a hood stops helping. Wikipedia's entry on the lens hood is direct about this: "if a light source is in the lens' angle of view, a lens hood will hardly have any effect." You need a different tool for a different situation.
My actual field technique is low-tech and works more reliably than any filter. I use my own hand, a hat brim, or a foreground rock to physically block the direct disc of the sun from hitting the front element while keeping it just outside the composition, or I accept a controlled amount of flare as part of the shot. Flare is not automatically a flaw. A soft veil of light across the frame, or a small chain of colored orbs trailing away from the sun, can add real atmosphere to a desert or mountain scene if you choose it rather than stumble into it. The difference between "bad" flare and "good" flare is almost always whether you composed for it. And whichever way you go, a genuinely clean front element matters more than people think. Dust, smudges, and fingerprints scatter light unpredictably and are a major secondary source of exactly the hazy, low-contrast flare you are trying to avoid.
Exposing for a silhouette on purpose
Shooting into the sun almost always means your foreground subject, a person, a dune crest, a lone acacia tree, goes dark. Fighting that with fill flash or heavy shadow recovery usually looks worse than embracing it. A silhouette is a deliberate exposure choice, not a failure to expose correctly. Wikipedia's entry on silhouette describes the technique precisely: "the exposure be adjusted so that there is no detail (underexposure) within the desired silhouette element, and overexposure for the background," and it names a specific benchmark, "a lighting ratio of 16:1 or greater," as what reliably reads as a clean silhouette instead of a muddy half-exposed shape. The same entry gives this backlit approach its formal name, contre-jour, literally "against daylight" in French.
The practical version of that ratio is simple. Meter, ideally with spot metering, directly on the bright sky near the sun, not on your subject and not on the overall scene average, which most matrix or evaluative metering modes will try to balance toward gray and ruin the effect. Lock that exposure, recompose, and let your subject underexpose completely into shadow. On a mirrorless body, switch on your exposure preview or histogram overlay and watch the right side of the histogram rather than trusting your eyes on a bright screen in direct sun, which will lie to you about how blown out the sky actually is.
Pro Tip: Clean, simple shapes make the strongest silhouettes. A single figure on a dune ridge, a lone tree, a camel train in profile, all read clearly as shapes against the sky. A cluttered foreground with overlapping subjects just turns into an unreadable dark mass, no matter how perfectly you nail the exposure ratio.
When one frame is not enough: bracketing and blending
Sometimes you do not want a pure silhouette. You want foreground detail and the sun and a colorful sky all holding together in one image, and that is where you run into the real limit of your sensor. A sun-in-frame desert sunset can easily span more stops of dynamic range than any single exposure can capture cleanly. This is exactly the problem high-dynamic-range imaging was built to solve: "capturing multiple frames of the same scene but with different exposures and then combining them into one, resulting in an image with a dynamic range higher than the individually captured frames."
In the field, I bracket three to five frames roughly one to two stops apart whenever my histogram shows clipping on both ends at once, the sun and sky blown on one side, the sand and foreground crushed to black on the other. Back on the laptop, I blend manually far more often than I run a full automatic HDR merge, because automatic blending has a habit of making the sun disc look soft-edged and artificial, exactly the opposite of the crisp sunstar you worked for in the first place. A faster alternative for less extreme scenes: expose for the sky and sun the way you want them to look, then selectively recover just enough foreground shadow detail in post rather than reaching for full exposure blending at all. It is less powerful but keeps the result looking like a photograph rather than a composite.
Why open desert horizons are the best practice ground
Every technique in this article gets easier with an open, unobstructed horizon, and nowhere delivers that quite like a true desert. A dune ridge gives you exact control over how much of the sun's disc you block simply by shifting your shooting position a few steps left or right, which is precisely the partial-obstruction trick a clean sunstar depends on. There is almost no foreground clutter to throw unplanned flare into your frame. And the contrast between a brilliant, sun-filled sky and dark, cooling sand is about as extreme as dynamic range gets, which makes the bracketing and blending section above immediately useful rather than theoretical.
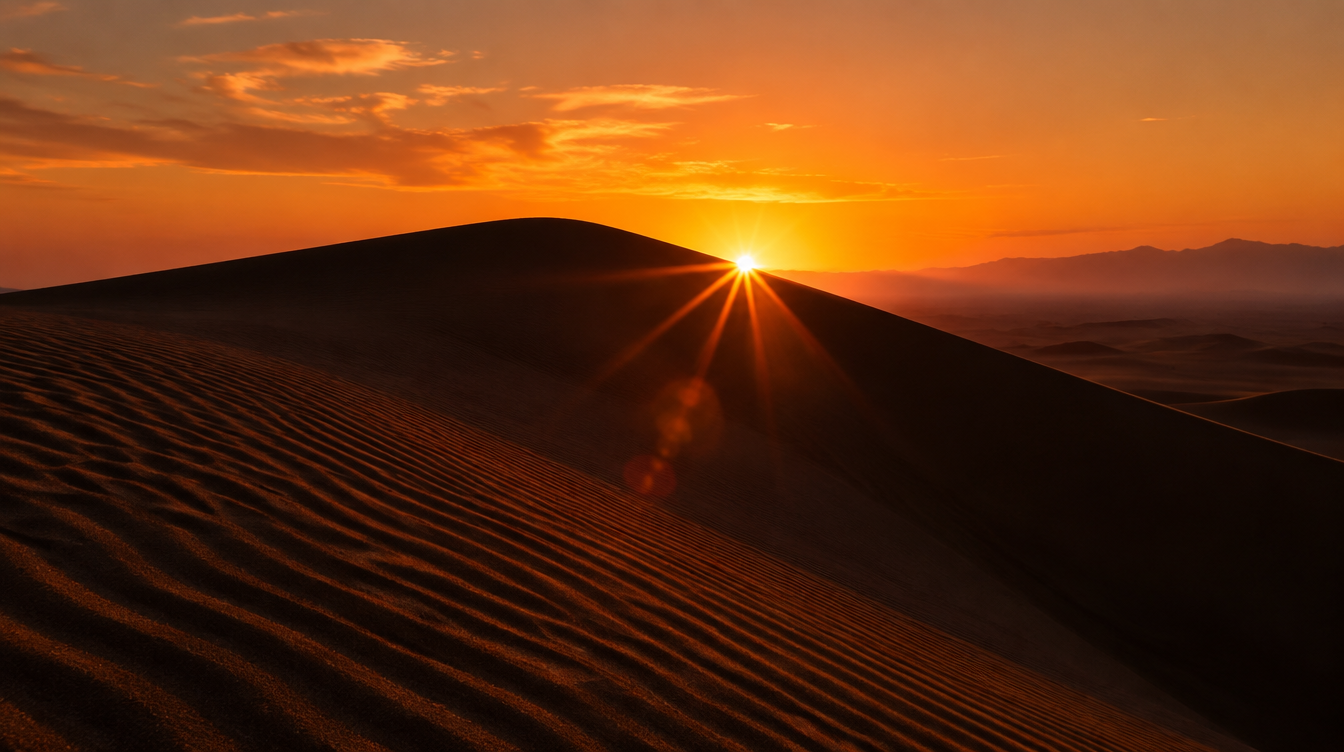
This is the exact scenario our Algeria Sahara Desert Photo Tour is built around. The current departure runs March 6 to 13, 2027, based in the Djanet region, with sunset shoots over the pink dunes of Erg Tin Merzouga, some reaching roughly 600 meters, where a dune crest is often the only thing between your lens and a completely clean horizon line. Guide Lorenzo Ranieri Tenti, a two-time Milky Way Photographer of the Year, builds the itinerary around exactly this kind of light, both the sunset sunstar and silhouette work covered here and the night sky work that follows once the sun is fully down. If you have been reading this guide wishing you had a dune instead of a tree line to work with, this is where you go get one.
The low, warm color of desert sunset light itself comes from the same atmospheric physics that produces crepuscular rays, the visible light beams you sometimes see fanning out from behind a dune or cloud edge. NASA's Earth Observatory explains that these rays appear "when incoming light is partially obstructed by a cloud or tall feature on the horizon," and that "dust particles suspended in the atmosphere enhance the visibility of these sunbeams," which is part of why a dusty desert sky often produces more dramatic beams than a clear coastal one. The same source points to Rayleigh scattering as the reason sunset light itself turns warm: as the sun gets lower, "the incoming light must pass through much more of the atmosphere than at high noon," scattering away more of the shorter blue wavelengths and leaving the oranges and reds that make this kind of shot worth chasing in the first place.
For a different flavor of the same low-sun-angle light in a cooler, wetter climate, our comparison of golden hour in Tuscany versus Iceland is worth a read. The physics behind the color is identical, but the result on a hazy Tuscan hillside looks completely different from the same angle over Icelandic coastline, which is a good reminder that these techniques travel with you wherever the horizon is open enough to use them.
A field checklist for shooting into the sun
When the sun is about to drop below a ridge or dune line and I have only a few minutes of good light left, I run through roughly the same short sequence every time rather than improvising from scratch.
| Goal | What to do |
|---|---|
| Clean sunstar | Stop down to f/11-f/22, position so only a sliver of the disc shows past an edge, check the result and adjust position rather than aperture first |
| Controlled flare | Block the direct disc with a hand or hat just outside frame, or compose deliberately around it; skip the lens hood, it will not help |
| Clean silhouette | Spot meter on the sky near the sun, lock exposure, recompose, keep the subject shape simple |
| Wide dynamic range | Check the histogram for clipping on both ends; bracket 3-5 frames 1-2 stops apart if needed |
| Front element | Wipe it clean before the light gets critical; dust and smudges create their own flare |
All of this sits inside the broader framework we cover in our full landscape photography guide, which walks through reading daylight and night light more generally. Shooting into the sun is one specific, technical slice of that larger skill set, but it is the slice that trips up the most photographers simply because it is the one situation where every piece of standard advice, meter for the scene, use a lens hood, avoid blown highlights, needs to be deliberately broken.
Frequently asked questions
What aperture is best for a sunstar? Generally f/11 to f/22. The star gets more defined as you stop down because diffraction at the diaphragm blades strengthens, but push most lenses much past f/22 and overall sharpness starts dropping from the same diffraction effect, so treat a very narrow aperture as a deliberate trade for one hero frame rather than your default landscape setting.
Why do some lenses make better sunstars than others? It comes down to the diaphragm's blade count and shape. An odd number of blades doubles the number of star points relative to the blade count, while an even number matches it. Straight blades, common on primes built with sunstars in mind, give crisper, more defined points than the curved blades many modern zooms use to produce smoother bokeh instead.
Do I need to fully or partially hide the sun to get a clean sunstar? Partially. Letting only a sliver of the disc peek past a dune ridge, rooftop, or horizon line cuts the total light enough for the diffraction spikes to actually show. A fully exposed disc, even stopped down hard, tends to blow out into a flat white shape with weak points instead.
Will a lens hood fix my flare problem? Not once the sun itself is inside your frame. A hood only blocks stray light coming from outside your composition. With the sun in frame, control flare instead by physically blocking part of the disc with your hand or a foreground object, keeping your front element spotless, or simply composing around the flare you get.
How do I expose for a silhouette without losing the sky's color? Spot meter on the bright sky near the sun rather than your subject, lock that exposure, and let the subject fall into shadow on purpose. A brightness gap of roughly 16:1 or greater between background and subject is the benchmark for a clean, readable silhouette rather than a muddy half-exposed shape.
When should I bracket or blend exposures instead of shooting one frame? Whenever your histogram shows you clipping the sun or sky highlights and the foreground shadows at the same time, which is common on a sun-in-frame desert sunset. Bracket three to five frames roughly one to two stops apart and blend selectively in post, or expose for the sky and recover just enough shadow detail manually, rather than relying on a full automatic HDR merge that can soften the sun disc's edge.
Sources
- Wikipedia: Diaphragm (optics), blade count and sunstar point geometry
- Wikipedia: Diffraction, the physics behind sunstars and small-aperture softening
- Wikipedia: Lens flare, internal reflection and coatings
- Wikipedia: Lens hood, why hoods fail against in-frame light sources
- Wikipedia: Silhouette, exposure ratio and contre-jour technique
- Wikipedia: High-dynamic-range imaging, exposure bracketing and blending
- NASA Earth Observatory: Crepuscular Rays and Light Scattering