Composing the Northern Lights: Why Foreground Makes or Breaks an Aurora Photo
The best aurora photos are landscape photos first. Here is how to use Iceland's real foregrounds, from Kirkjufell to a glacier lagoon, to compose around an unpredictable sky.
Composing the Northern Lights: Why Foreground Makes or Breaks an Aurora Photo
The first time I stood under a strong aurora in Iceland, I did what almost every first-timer does: I pointed my lens straight up and fired. The result was a perfectly sharp, perfectly boring photo of green light on a black rectangle. It took me a few more trips, and a lot of frames that went straight into the trash, to understand something that changed how I shoot the sky for good. The aurora is not the subject. It is the light. The subject is whatever is standing underneath it.
This article is not about camera settings. If you want the shutter speed, ISO, and Kp index side of aurora photography, we cover that in our guide to northern lights settings and forecasts. What we are going to talk about here is the part that actually separates a photo people scroll past from one they stop on: what you put in the bottom two thirds of the frame while the top third is doing something spectacular on its own schedule.
Key Takeaways
A strong aurora photo is a landscape photo that happens to have the northern lights in it, not a sky photo with scenery underneath. Build the composition around a real foreground first.
| Point | Details |
|---|---|
| Core principle | Choose and light your foreground before you worry about the sky, since the sky will change on its own |
| Why the aurora moves unpredictably | Substorms can spread across the magnetosphere within minutes, so a faint arc can become a full overhead corona with little warning |
| Best mountain anchor | Kirkjufell, a 463 m peak on the Snaefellsnes Peninsula, works as a single dominant silhouette |
| Best water anchor | A glacier lagoon like Jokulsarlon, where icebergs and reflections double your compositional options |
| Best structure anchor | A small, solitary building, such as a black timber church, for scale and human contrast against a vast sky |
| Rule of thirds | Useful as a starting point for framing, not a law, since studies of real images show it correlates only weakly with what actually looks good |
Table of Contents
- The mistake: treating the aurora like a sky photo
- Why foreground is the real subject
- Composing for a subject that will not sit still
- Three Icelandic anchors, and how to use each
- Practical framing techniques
- Scouting by day for a photo you take at night
- Frequently asked questions
- Sources
- Recommended
The mistake: treating the aurora like a sky photo
I see the same frame on nearly every first night of a tour. Someone sets up facing whatever direction the lights are brightest, tilts the camera up thirty or forty degrees, and shoots a sky that fills the entire frame. The photo is technically fine. The exposure is right, the stars are sharp, the green is saturated. And it is almost always the least interesting photo that person takes all week, because there is nothing in it to tell you where you are, how big the sky is, or why it mattered that you were standing there and not looking at a screensaver.
The fix sounds almost too simple to be useful: stop thinking about the aurora as the photo and start thinking about it as the light source for a landscape photo you would want to take even without it. If a composition does not work in daylight, with hills, water, a mountain, or a building anchoring the frame, adding green light to the sky will not save it. It will just be a slightly more colorful version of the same empty frame.
This is also the single biggest difference between the photos tour guests bring home from a well-planned night and the photos most independent travelers end up with after driving to the first pullout with a clear view north. The sky does the same thing for everyone. What changes the result is whether you were standing somewhere with a real foreground when it happened.
Why foreground is the real subject
It helps to understand, briefly, what you are actually photographing when you point a lens at the aurora, because it explains why the sky alone is such a thin subject. The lights are produced when energetic particles carried from the sun by the solar wind, guided by Earth's magnetic field, collide with gases high in the atmosphere, forming what scientists call the auroral oval, a ring of activity that circles the magnetic pole (NASA's overview of the aurora lays this mechanism out clearly). The green you see most often comes from oxygen molecules excited by electrons roughly 60 miles, about 100 kilometers, above the ground (NASA's aurora science page explains the altitude and color chemistry in more detail).
What that means for a photographer is that the aurora is, physically, a diffuse glow spread across an enormous area of sky, with no hard edges, no single focal point, and no fixed shape. It is beautiful, but it is formless. A mountain has a silhouette. A glacier lagoon has ice floes with individual shapes and reflections on the water. A church has a roofline. Every one of those gives a viewer's eye a place to land before it travels up into the sky. Without that anchor, the aurora is just color on a black background, and color on a black background gets old after about four photos.
There is a practical exposure consequence to this too, even though settings are not the focus here. Because your foreground is usually much darker than the sky once the aurora brightens, it is worth metering and framing for the foreground first, while the display is still building, rather than waiting for a bright peak and discovering your mountain or church is a silhouette with no detail left to recover. Decide what the foreground should look like before the light show gets good, because once it does, you will not want to be fiddling with composition.
Pro Tip: On your first clear night, spend ten minutes before the aurora gets active just composing and focusing on your foreground with the sky as a plain backdrop. Lock focus, note your framing, and you will spend the rest of the night reacting to the sky instead of hunting for a composition in the dark.
Composing for a subject that will not sit still
Composing around a mountain or a waterfall is relatively forgiving, because the subject does not move. Composing around the aurora is a different problem, because the one thing you cannot control is where the brightest part of the display will be, how tall it will stretch, or when it will intensify. Geomagnetic substorms, the bursts of activity that make a faint arc suddenly flare into ribbons or a corona overhead, can start small and spread across a huge area of the magnetosphere within minutes (NASA's THEMIS mission page on substorm behavior is the source for that timeline). You can be composed for a low arc on the horizon and have the whole sky light up thirty seconds later.
That uncertainty should change how you compose, not just how you react. Leave more negative space above your foreground than you think you need. A composition with generous headroom works whether the aurora stays a thin green line or erupts into a full corona, while a tight crop built for a modest display gets blown out visually the moment the lights intensify and there is nowhere left in the frame for them to go. I will often set up two options on a strong night: a wider frame that can absorb an unpredictable, expanding display, and a tighter one I switch to only once I can see the shape the display has settled into.
This is also where checking the forecast earns its place in a composition conversation, not just a settings one. Iceland's own Meteorological Office publishes a nightly aurora forecast on a 0 to 9 strength scale layered over a cloud cover map, because a strong geomagnetic forecast is useless if the sky above your chosen foreground is socked in (the Icelandic Met Office's aurora forecast page shows both numbers together for exactly this reason). Knowing roughly how active a night is likely to be helps you decide, before you drive anywhere, whether to commit to a single ambitious composition or stay flexible near a few backup foregrounds.
Three Icelandic anchors, and how to use each
Iceland is unusually well supplied with foregrounds that work for exactly this reason, and on our Iceland Winter Aurora tour we build the itinerary around a small set of them rather than hoping the lights happen to appear over whatever parking lot we are standing in. Three types come up again and again, and each solves the "what goes under the sky" problem differently.
Mountain as anchor: Kirkjufell
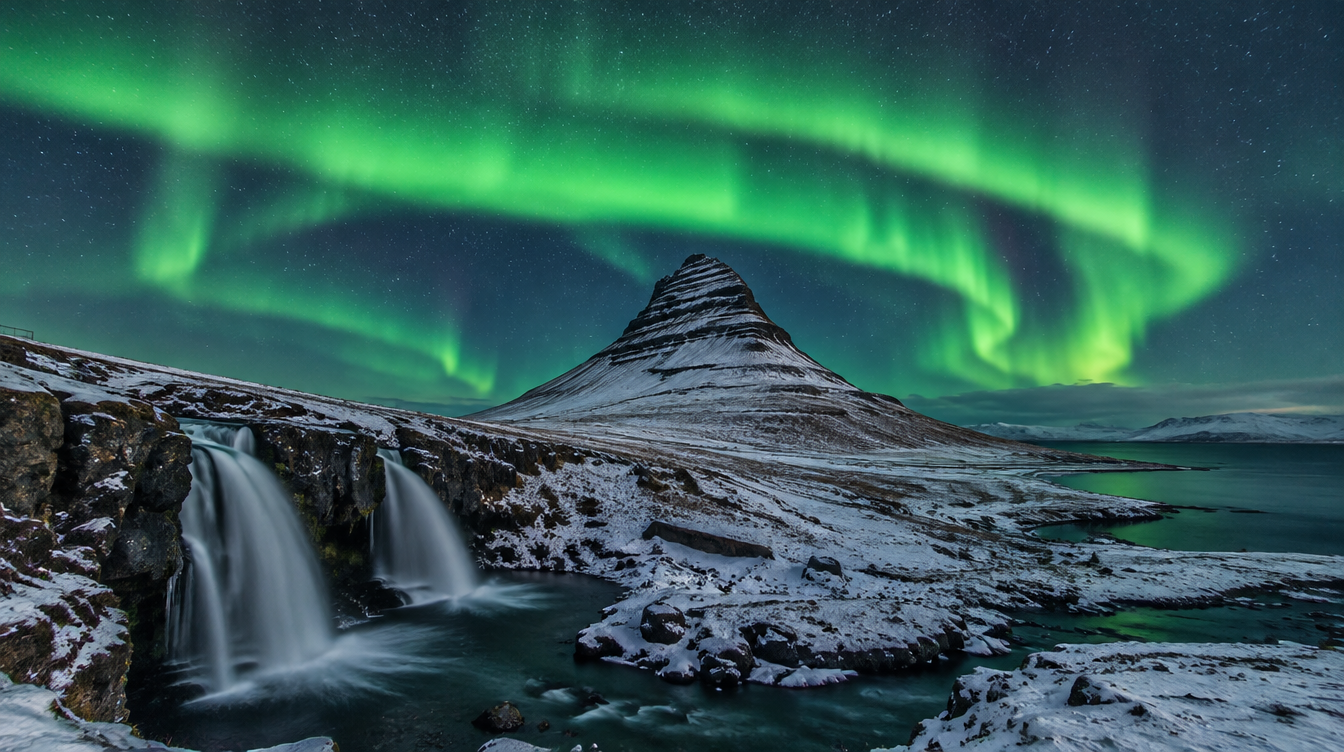
Kirkjufell is a 463 meter peak on the Snaefellsnes Peninsula near the town of Grundarfjordur, and it is frequently described as the most photographed mountain in the country, partly thanks to its distinctive stepped shape and partly thanks to a cameo in Game of Thrones (Wikipedia's entry on Kirkjufell covers both the geology and the filming history). We go into the full range of compositions here in our Kirkjufell photography guide, but the aurora-specific lesson is this: the mountain and the nearby waterfall, Kirkjufellsfoss, sit far enough apart that trying to hold both in one frame usually weakens the shot rather than strengthening it. Pick one. On most nights I point photographers toward the upper tier of the falls with the mountain rising behind it as a single, clean silhouette, rather than fighting to squeeze two separate landmarks into a composition that was never designed to hold both.
Water as anchor: a glacier lagoon
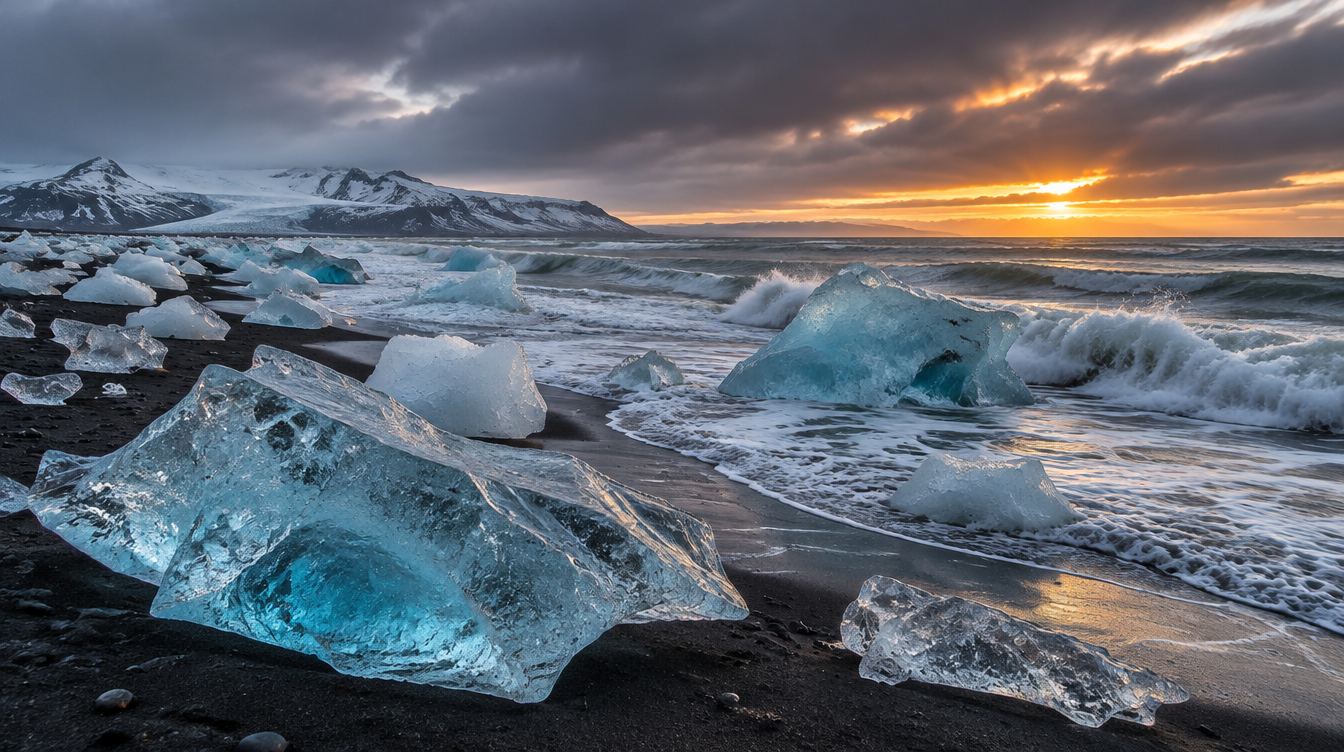
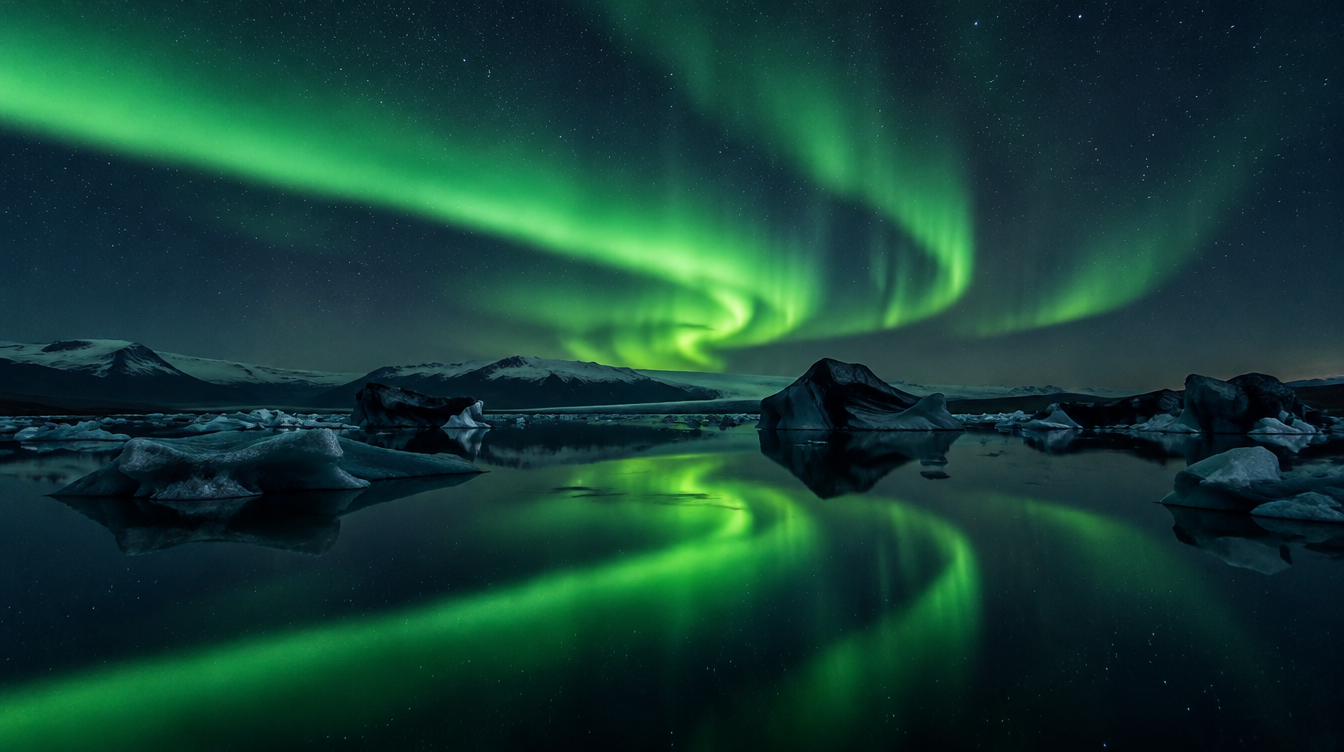
A glacier lagoon solves the foreground problem differently, by giving you shapes that repeat. Jokulsarlon, Iceland's largest and most active glacial lake, formed in the mid-1930s as the Breidamerkurjokull glacier retreated and has roughly quadrupled in area since the 1970s as that retreat has continued (Wikipedia's entry on Jokulsarlon covers the lagoon's formation and growth). We cover the daytime side of shooting here in our guide to Jokulsarlon and Diamond Beach, but at night the icebergs scattered across the water do double duty: they give the eye individual shapes to travel between in the foreground, and on a still night they throw a second, fainter copy of the aurora back at you as a reflection. That reflection is the closest thing to a guaranteed "wow" composition in the entire country, provided the wind cooperates enough to keep the water flat.
Structure as anchor: a solitary church
The third anchor is the one most visitors do not think to look for: a small, human-made structure standing alone against an otherwise empty landscape. Iceland has a handful of weathered black timber churches that sit by themselves on open ground, the sort of thing you pass driving the Snaefellsnes Peninsula near Arnarstapi and Hellnar, and they do something a mountain cannot. A church roofline is instantly recognizable as human scale, so it gives a viewer an immediate sense of just how enormous the sky above it actually is. You lose the drama of a mountain's height, but you gain a contrast that a natural landmark alone cannot provide.
| Anchor type | Best for | Main composing challenge | Backup plan if clouded out |
|---|---|---|---|
| Mountain (Kirkjufell) | A single bold silhouette with real height | Resisting the urge to include the waterfall and the peak in one frame | Shoot the mountain itself under stars or moonlight as a standalone landscape |
| Water (glacier lagoon) | Reflections and repeating iceberg shapes | Needs calm wind for the reflection to actually appear | Shift to ice detail shots or a wider shoreline composition without the reflection |
| Structure (solitary church) | Human scale against a huge sky | Keeping the building from reading as a small, lost detail in a wide frame | Move in closer and let the building fill a larger share of the lower frame |
If you are planning a trip and can only reasonably get to one or two of these, I would build the itinerary around whichever type you do not already have good daylight photos of, since the aurora versions will complement rather than duplicate what you shoot during the day.
Practical framing techniques
A few habits make the difference between a composition that works and one that almost works. First, treat the rule of thirds as a starting point, not a rulebook. It is a genuinely old idea, first written down in 1797, and it has outlived its original authority: a 2014 study of real photographs and paintings found it correlated only weakly, if at all, with how good people actually judged the images to be (Wikipedia's entry on the rule of thirds covers both the history and that study). Use it to decide roughly how much sky versus foreground you want, then trust your eye over the grid lines.
Second, think in leading lines even in the dark. A fjord edge, a black sand shoreline, a gravel road, or the curve of a riverbank all pull a viewer's eye from the bottom of the frame up toward the aurora, and they read clearly even in a long exposure where everything else is a soft silhouette. Third, do not default to horizontal. A tall, narrow aurora ribbon or a corona directly overhead is sometimes better served by a vertical frame or a stitched panorama than by the wide horizontal shot everyone reaches for first, especially over a dramatic subject like Kirkjufell or the sea stacks near Vestrahorn's Stokksnes headland, which sits on Iceland's southeast coast near the town of Hofn (Wikipedia's entry on Stokksnes covers the headland's geography).
Pro Tip: If you only have one composition idea for the night, make it one with a reflection or a repeating shape, like ice floes or tide pools, rather than a single isolated subject. Repetition gives the eye more to do while it waits for the sky to change, and it almost always reads as a stronger photo even before the aurora shows up.
Scouting by day for a photo you take at night
Almost every strong aurora photo I have taken in Iceland was composed, at least roughly, in daylight. Finding a foreground in the dark, with a headlamp and a half-frozen tripod, while also watching the sky, is a recipe for a composition you settle for rather than one you chose. On tour days, we deliberately drive past the locations we plan to return to at night so everyone has already seen the shoreline, the parking access, and the exact angle a mountain or church sits at relative to north, before conditions matter.
If you are planning your own trip, do the same thing. Walk your shortlist of foregrounds in the afternoon. Note where north actually is relative to the landmark, since that tells you which direction the aurora is most likely to build from. Note the walking distance from parking, since you do not want to be hiking fifteen minutes over uneven ground in the dark when the display is already building. And note a backup foreground nearby, because Icelandic weather changes fast enough that your first choice may be clouded out by the time the sky actually cooperates.
This kind of groundwork, scouting in daylight, having two or three foreground options ready, and understanding roughly how a display tends to build and spread, is exactly what a guided trip compresses into days instead of the week or more of trial and error it took me to work out on my own. Our Iceland Winter Aurora tour is built around that idea: seven days and seven nights with a maximum of ten photographers and one guide dedicated to reading the sky and getting you to the right foreground before the lights appear, not after. It runs from Keflavik, covers the locations in this article along with Jokulsarlon, Diamond Beach, Reynisfjara, and Vestrahorn, and includes image review sessions where we look at exactly this kind of composition decision together the morning after.
Frequently asked questions
Do I need a tripod and a wide-angle lens to compose aurora photos?
A tripod is close to mandatory, since you are working with long exposures in the dark. A wide-angle lens helps you
include a meaningful foreground alongside a large sky, but the composition principles here apply at any focal
length. A longer lens can isolate a single anchor, like just the church roofline or just the mountain's silhouette,
if you would rather simplify the frame than widen it.
What makes a good foreground for northern lights photos in Iceland?
Anything with a clear, recognizable shape against the sky: a mountain silhouette, water that can reflect the
display, or a solitary structure that gives a sense of scale. The common thread across Kirkjufell, a glacier
lagoon, and a solitary church is that each gives a viewer's eye somewhere to land before it travels up into the
aurora.
Should the aurora or the foreground be in sharp focus?
Both, ideally, since you are usually focused near infinity for a wide landscape composition and the aurora itself
is effectively at infinity too. The real challenge is rarely focus. It is making sure your foreground has enough
exposure and detail to hold its own once the sky brightens, which is the composition and exposure-order point this
article focuses on.
How do I compose a shot when I do not know where or how the aurora will appear?
Leave more negative space above your foreground than feels necessary, and prefer a wider frame over a tight one
until you can see the shape a display has settled into. Because substorms can spread across a wide area of sky
within minutes, a composition built with room to grow handles a sudden, intense display far better than one
framed tightly around a faint arc.
Is the rule of thirds still useful for aurora photography?
As a rough starting point for how much sky versus foreground to include, yes. As a strict rule, no. It is a
centuries-old convention rather than a law of good composition, and real-world studies have found it a weak
predictor of what actually looks strong, so treat it as a guideline you are free to break once you have a reason
to.
Can I use a reflection as my foreground anchor?
Yes, and it is one of the most reliable ways to strengthen an aurora composition. A glacier lagoon, a calm fjord,
or even a shallow tide pool on black sand can mirror the display back at you, effectively doubling the subject in
the frame. The only real requirement is calm wind, since even a light breeze breaks the reflection apart.
Sources
- NASA JPL: Aurora science overview
- NASA Science: Auroras
- NASA: THEMIS mission page on substorms
- Icelandic Meteorological Office: Aurora forecast
- Wikipedia: Kirkjufell
- Wikipedia: Jokulsarlon
- Wikipedia: Stokksnes
- Wikipedia: Rule of thirds