How to Photograph the Northern Lights: Settings, Forecasts, and Patience
How to read the Kp index and solar wind data honestly, set your camera for fast or slow aurora, protect your gear from the cold, and compose with real Icelandic and Lofoten foregrounds.
How to Photograph the Northern Lights: Settings, Forecasts, and Patience
Every trip I lead chasing the aurora starts with the same question on the first night: "will we see them tonight?" I have learned to give the same honest answer every time. Nobody knows for certain, and that uncertainty is not a flaw in the forecast, it is the nature of the thing we are trying to photograph. What I can promise is that if the lights do show up, you will be standing in the right place with your camera already set up correctly, because that part is entirely within your control.
This guide is the aurora talk I give on our Iceland and Lofoten trips, written down properly for once. It covers reading a forecast without fooling yourself, setting your camera for whatever the sky throws at you, keeping your gear working well below freezing, and where to point your lens once the lights appear. None of it requires luck. Most of it just requires knowing what the numbers in a forecast app actually mean.
Key Takeaways
There is no single trick to photographing the northern lights. There is a forecast you can read honestly, a camera setup you adjust to what the sky is actually doing, and a cold-weather routine that keeps your gear alive long enough to use it.
| Point | Details |
|---|---|
| What the Kp index really is | A 3-hour planetary average of geomagnetic activity on a 0-9 scale, not a live, local reading |
| How far ahead it can be forecast | NOAA's short-range nowcast is useful 30 to 90 minutes out; anything further depends on predicting a solar storm that has not fully left the sun yet |
| Base camera setup | Manual mode, your widest aperture, manual focus near infinity, RAW files, tripod and a remote or self-timer |
| The one setting that actually changes night to night | Shutter speed, depending on whether the aurora is moving fast and bright or sitting as a slow, faint glow |
| Biggest gear risk in the cold | Battery drain and condensation when you come back indoors, both preventable with simple habits |
Table of Contents
- "Will I see the northern lights tonight?" is the wrong first question
- Reading the forecast: what the Kp index actually tells you
- Camera settings for aurora: there is no single correct exposure
- Cold-weather care: batteries, condensation, and working hands
- Composing the shot: Icelandic and Lofoten foregrounds
- Patience as a technique: what to do on a quiet night
- Frequently asked questions about aurora photography
- Chase the aurora with us
"Will I see the northern lights tonight?" is the wrong first question
I understand why everyone asks it. You have flown a long way and booked a trip around a specific week, and you want a straight answer. The honest one is that nobody, including the scientists running the forecast models, can tell you with certainty what the sky will do six hours from now. What they can tell you, and what most beginner guides gloss over, is a set of probabilities built from real physics: how active the sun is, how strong the resulting geomagnetic activity is likely to be, and how far toward the equator the oval might stretch. Learning to read those numbers honestly, rather than treating a forecast app score as a yes or no answer, is the skill.
The second half of the equation, which gets far less attention, is your own readiness. A strong display that catches you fumbling with settings in the dark, or shuts your camera down because the battery died earlier, is wasted. This guide removes those two failure points.
Pro Tip: Build your shooting plan around the darkest, clearest hours of the night rather than one predicted "peak" time. Geomagnetic activity can arrive early, late, or in short bursts, and a photographer who stays at a dark, clear spot for three hours beats one who shows up for a single forecasted hour and packs up.
Reading the forecast: what the Kp index actually tells you
Almost every aurora app leads with the same number: the Kp index, on a scale from 0 to 9. Most beginner articles treat it as a simple go or no-go threshold, and that is where they lose the plot. The National Centers for Environmental Information defines Kp as a planetary index covering a full 3-hour window, the mean of standardized K-indices from thirteen observatories spread between 44 and 60 degrees geomagnetic latitude. In plain terms, it is a 3-hour average of how disturbed Earth's magnetic field was globally, not a live reading of what is happening above your head.
That distinction matters because the aurora can flare up and fade well inside a single 3-hour Kp window. A forecast of Kp 4 for the evening does not mean four hours of steady mild activity. It can mean one strong substorm and two quiet hours averaged together. According to NASA's Goddard Space Flight Center, Kp values of 5 or higher count as storm-level activity, and 7 or higher counts as a severe geomagnetic storm. NASA's own examples show how far the aurora can push toward the equator as Kp climbs: at Kp 3 it is visible only at fairly high latitudes, while at Kp 9 and above it has reached as far south as Texas and Florida. High latitude destinations like Iceland and Lofoten sit far enough north that even a modest Kp reading can put the oval directly overhead, which is a big part of why we run trips there. As Wikipedia's summary of the scale puts it, a Kp of 3 corresponds to relatively low activity while a Kp of 9 represents high activity.
The real driver is the solar wind, the stream of charged particles leaving the sun at around 400 kilometers per second, running several times faster during a storm triggered by a coronal hole or a coronal mass ejection. Energy transfers into Earth's magnetic field most efficiently when the interplanetary magnetic field carried by that wind points south, and a prolonged southward stretch triggers the substorms that make the aurora intensify. A coronal mass ejection itself, as NASA's Marshall Space Flight Center describes it, is a huge bubble of gas threaded with magnetic field lines, ejected from the sun over several hours. Because that bubble has to cross millions of miles of space first, its exact speed and timing are genuinely hard to pin down days ahead, which is the honest reason a forecasted storm can underdeliver, or a quiet forecast can suddenly flare.
This is where NOAA's own tools are more useful, and more honest, than a single Kp number. NOAA's OVATION model uses real-time solar wind data measured at the L1 point, upstream of Earth, to forecast the oval's location and intensity roughly 30 to 90 minutes ahead. That short-range nowcast is reliable because it works from data the solar wind has already produced, not a prediction of what the sun will do next. Anything beyond that window, including the multi-day outlooks most apps display, is a rougher estimate. I tell our groups to treat a 3-day outlook as a reason to stay flexible, and the 30 to 90 minute nowcast as the number worth checking on the way to a shooting location.
None of this replaces the oldest forecasting tool of all, which is simply looking up, since even a severe storm is invisible behind cloud cover. The Icelandic Meteorological Office states it plainly: the spectacle requires dark and partly clear skies, which is why its forecast tool pairs a 0 to 9 auroral activity scale with a live cloud cover map and the night's sunset and moonrise times, rather than the activity number alone. A moonless, clear, dark window with modest activity will consistently outperform a high Kp forecast under total cloud cover.
If you want a deeper read on how latitude and darkness interact in Iceland specifically, including how far the long winter nights stretch your shooting window, our guide to mastering golden hour photography in Iceland covers the light side of that same equation.
Camera settings for aurora: there is no single correct exposure
Nearly every aurora article online prints one fixed setting, something like ISO 1600, f/2.8, fifteen seconds, as if the northern lights behave the same way every single night. They do not. A slow, faint glow sitting low on the horizon and a fast, bright display rippling directly overhead are two completely different photographic subjects, and treating them with the same shutter speed is the single most common mistake I see on our trips.
Start with the fixed part of the setup, which does not change night to night. Shoot in full manual mode so the camera is not guessing in near darkness. Open your aperture as wide as your lens allows, typically around f/2.8. Set focus manually by using live view to zoom into a bright star and adjusting until it is a sharp point rather than a soft blob, which lands you at or very near infinity. Shoot in RAW for real latitude to recover shadow detail and white balance afterward. Mount on a solid tripod, and trigger the shutter with a remote, a cable release, or your self-timer so you are not introducing shake by pressing the button directly.
The variable that actually changes from night to night is shutter speed, and it should track how the aurora is moving. A bright, fast-moving display with visible pillars will blur into a flat green smear if you expose it too long, so you want a shorter shutter, sometimes as brief as one or two seconds, to freeze that structure. A faint, slow glow has no fast motion to preserve, so it can tolerate a much longer exposure, sometimes twenty seconds or more. The trade-off is ISO: a shorter shutter means less light gathered, so you compensate with a higher ISO and more noise. I treat this as a sliding scale, watching the display for a minute before committing and adjusting as it speeds up or slows down. This is standard field practice, not a single textbook number.
Pro Tip: Set your white balance to a fixed Kelvin value, somewhere around 3200 to 4000K, rather than Auto. Auto white balance will shift unpredictably between frames as the aurora's color and brightness change, which makes it much harder to judge your exposure consistently from one shot to the next. Check your histogram after every frame instead of trusting how bright the image looks on a dim screen at night.
One habit worth building before your trip: run through this exact sequence, aperture wide open, manual focus at infinity, a starting shutter speed and ISO, at home in your own backyard on any clear starry night. Aurora season is not the time to be learning your camera's manual mode menus for the first time, especially while wearing thick gloves at ten degrees Fahrenheit.
Cold-weather care: batteries, condensation, and working hands
The best aurora forecast is worthless if your camera shuts itself off from cold, or your lens fogs solid the moment you bring it back inside. Most forum advice on this is secondhand, so I prefer what the manufacturers themselves publish. Nikon's own cold-weather shooting guide makes it clear: cold drains batteries of any kind, which is why a fully charged battery drops far faster at minus ten than at room temperature. The fix is to start every session with a full charge and carry one or two spares kept warm inside your coat, in an inner pocket, rather than in a cold camera bag. I swap a cold battery for a warm one the moment the meter drops fast, since a battery that reads empty in the cold often recovers capacity once it warms back up.
Condensation is the other classic failure, and it happens on the way back indoors. Moving cold gear straight into a warm, humid room condenses moisture on and inside the camera, a real risk to electronics and lens elements. Nikon's fix is to seal the camera in a bag before bringing it indoors and let it warm up gradually rather than exposing it to the room's air right away. Warming the gear too quickly is what causes the fogging, and it may need an hour or more to fully acclimate before it is safe to reopen the bag. I hand every guest on our Iceland and Lofoten trips a gallon freezer bag on the first night for exactly this reason.
A few more field habits: shield the camera from wind, rain, and snow, avoid changing lenses outdoors in bad conditions, and use your lens hood to keep snow and spray off the front element. Bring a headlamp with a red light mode, since a white headlamp wrecks your own night vision and everyone else's, pack more memory cards than you think you need, and wear gloves that let you actually operate dials. For a broader comparison of cold-weather gear against a completely different climate, see our piece on photography gear for Tuscany versus Iceland.
Composing the shot: Icelandic and Lofoten foregrounds
A technically perfect exposure of an empty sky is still a boring photograph. The aurora is the light source, but your foreground is what turns the image into a place rather than a screensaver, and this is where knowing the actual ground you are standing on matters far more than generic advice to "find a lake."
In Iceland, our aurora hunts build around a handful of locations chosen for their foregrounds. Kirkjufell, the cone-shaped mountain on the Snaefellsnes peninsula, gives you an instantly recognizable silhouette to anchor a wide composition. Jokulsarlon, the glacier lagoon, adds icebergs that catch green and violet light on the still water, about as dramatic a foreground as this planet offers. The black sand coast near Vik gives texture and contrast against the aurora's color, and the Reykjanes peninsula near Keflavik offers quieter compositions on nights closer to the airport. Across a single week we move between these so a group comes home with varied foregrounds rather than five versions of the same shot.
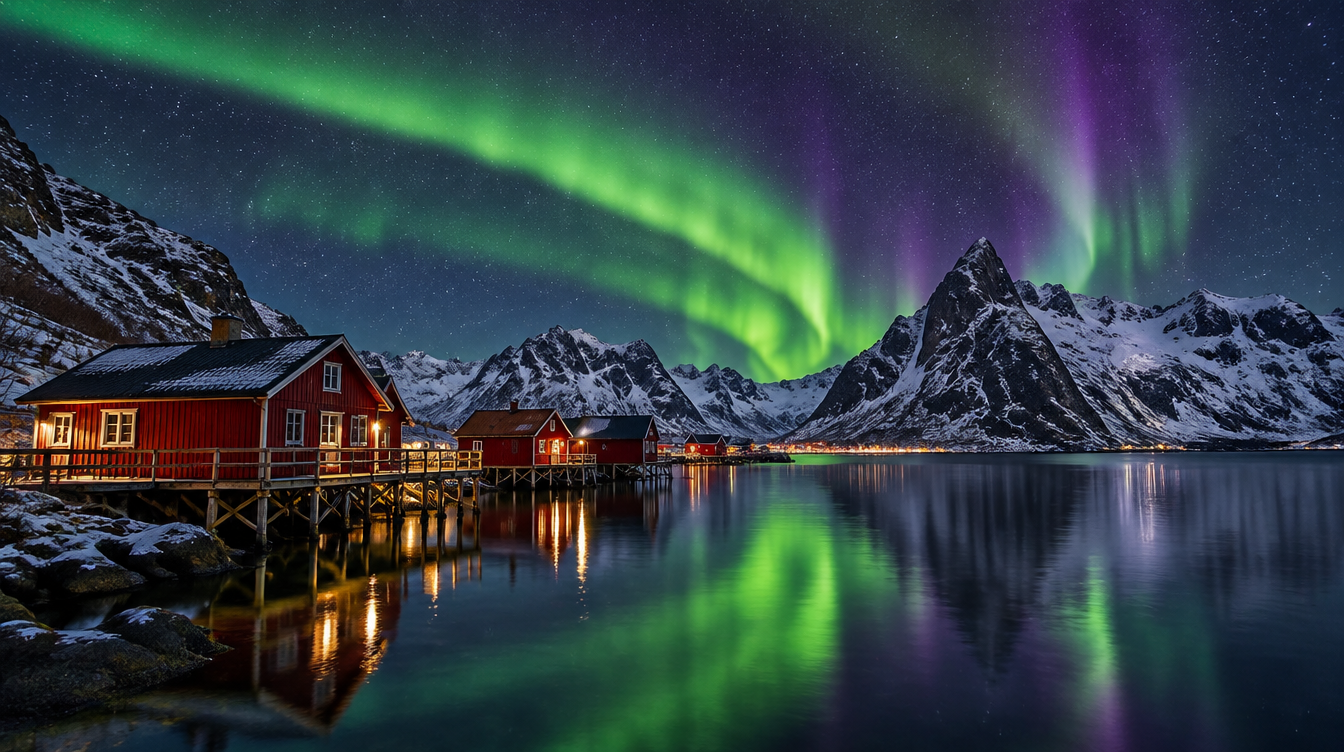
Lofoten plays by different rules. The archipelago sits north of the Arctic Circle at roughly 68 to 69 degrees latitude, far enough north that towns like Svolvaer and Leknes get a true polar night, with no sunrise at all for several weeks around the turn of the year. That depth of winter darkness is what makes it such a serious aurora destination, paired with some of the Arctic's most photogenic fishing-village architecture. The red boathouses at Reine and Hamnoy, built out over the water on stilts, give you a foreground with real human history in it. Uttakleiv Beach and Skagsanden Beach offer wide, flat sand and scattered rocks that double as reflective surfaces on calm nights, and the Fredvang bridges add a rare man-made leading line across water framed by jagged peaks. Aurora viewing there is opportunistic around a broader itinerary rather than a fixed hunting plan, which suits photographers who want the mountains and villages to carry the trip even on quiet nights.
A few composition habits apply in both places. Put a strong foreground anchor in the frame rather than shooting sky alone, since that is what separates a memorable image from a stock photo. Wet sand or still water mirrors the aurora's color almost like a second light source, so walk the shoreline before dark to find a clean reflection. At the wide focal lengths most aurora photography uses, keep your horizon level, since a tilt reads as sloppy far more obviously under a dramatic sky than in daylight.
If chasing both the forecast and the foreground sounds like more coordination than you want to manage solo in a foreign country in the dark, this is exactly the logistics we handle on our Iceland Winter Aurora tour and our Lofoten Northern Lights tour, down to knowing which locations are worth the drive on a given night's forecast.
Patience as a technique: what to do on a quiet night
Some nights, the forecast looks promising and the sky simply does not cooperate, or the display is so faint it barely registers to the naked eye while your camera, given a long enough exposure, still pulls out real color and structure. I treat patience as an active technique rather than passive waiting, because what you do during the quiet stretches determines whether you are ready the moment things change.
Use the quiet time to shoot test frames and refine your composition in the dark, since you will not want to be hunting for a foreground once the sky lights up. Work the ambient light that is already there, whether starlight on snow or moonlight on water, and treat those as genuine photographs rather than throwaway test shots. Keep checking NOAA's short-range nowcast rather than staring at the sky, since a faint glow can intensify within minutes and the nowcast will tell you sooner than your own eyes in the dark.
Most of all, remember a forecast is a probability, not a promise, for the same reason we covered earlier: nobody can perfectly predict how fast a coronal mass ejection will arrive or how strong it will be. The photographers who come home with the strongest images are rarely the ones who found the single best forecast of the year. They are the ones who were outside, dressed properly, with a camera already dialed in, on enough clear, dark nights to be standing there when conditions turned.
Frequently asked questions about aurora photography
Does a high Kp index guarantee I will see the northern lights? No. Kp is a 3-hour planetary average of geomagnetic activity, not a live or local reading, and you still need dark skies with gaps in the cloud cover. A forecasted storm can also underdeliver because the speed and timing of the coronal mass ejection driving it are hard to predict precisely in advance.
How far in advance can the aurora actually be forecast? NOAA's OVATION-based nowcast, built from real-time solar wind measurements, is reliable roughly 30 to 90 minutes ahead. Forecasts beyond that window get less certain because they depend on predicting how a solar storm will develop before it has fully left the sun.
What camera settings should I start with for aurora photography? Manual mode, your widest available aperture, manual focus set near infinity, RAW capture, and a shutter speed you adjust to how fast the aurora is moving. A slow, faint glow can take a long exposure of twenty seconds or more, while a fast, bright display needs a much shorter shutter, sometimes just one or two seconds, or its structure blurs into a flat glow.
Why does my battery die so fast photographing the aurora? Lithium-ion batteries lose capacity in cold temperatures. Start every session with a full charge, and carry one or two spares kept warm in an inner coat pocket rather than in a cold camera bag.
How do I stop my lens from fogging up when I come back inside? Seal the camera in a bag before bringing it from the cold into a warm room, and let it warm up gradually inside that bag. Warming it too quickly is what causes the fogging in the first place.
Is Iceland or Lofoten better for aurora photography? Both sit far enough north to be viable often, but offer different experiences. Lofoten, at roughly 68 to 69 degrees latitude, has a true polar night with weeks of no sunrise in December and January and dramatic fishing-village foregrounds, while Iceland builds a dedicated aurora-hunting schedule around varied foregrounds like Kirkjufell and Jokulsarlon across a single week. The choice depends on which foregrounds and pace you want, not which location sees the lights more often.
Chase the aurora with us
Everything here is the version we use in the field. Our seven day Iceland Winter Aurora tour takes a group of up to ten through a dedicated aurora-hunting schedule built around Kirkjufell, Jokulsarlon, the coast near Vik, and Reykjanes, with coaching and an image review session built in. Our eight day Lofoten Northern Lights tour keeps the group smaller, at six, moving through Reine, Hamnoy, Uttakleiv Beach, Skagsanden Beach, and the Fredvang bridges, with aurora viewing woven opportunistically into a trip that stands on its own even on quiet nights. Both are led by guides named Milky Way Photographer of the Year, exactly the kind of night-sky experience you want next to you when the forecast turns promising.
Sources
- NOAA National Centers for Environmental Information: geomagnetic indices and the Kp scale
- NASA Goddard Space Flight Center: Kp index storm thresholds and aurora visibility
- Wikipedia: Aurora, solar wind, coronal mass ejections, and the Kp scale
- NASA Marshall Space Flight Center: coronal mass ejections
- Icelandic Meteorological Office: aurora forecast
- Nikon USA: tips for shooting in cold weather
- Wikipedia: Lofoten, latitude and polar night