Mountain Landscape Photography: Lessons From the Dolomites
Alpenglow timing, hut-to-hut sunrise logistics, the science behind the Dolomites' famous sea of clouds mornings, and how to stay safe at altitude while you shoot.
Mountain Landscape Photography: Lessons From the Dolomites
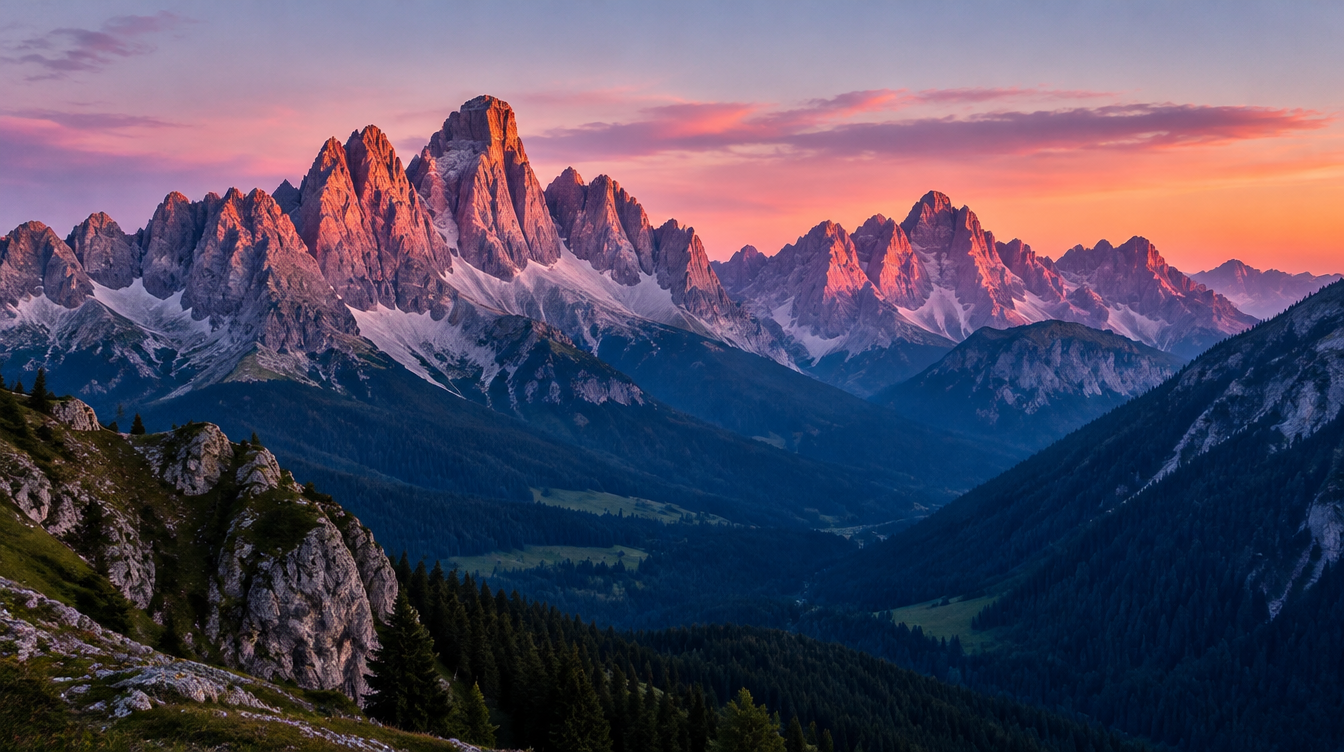
The first time I stood on a rifugio terrace in the Dolomites at five in the morning, camera already on the tripod, I remember thinking the light was going to ruin the shot. The sky to the east was still grey, no gold anywhere, and I genuinely wondered if I had the time wrong. Then, maybe four minutes before the sun actually cleared the ridge, the whole range in front of me turned a color I still have trouble describing without sounding like I am exaggerating: a deep, cold rose that had nothing to do with direct sunlight at all. That is alpenglow, and it taught me more about mountain photography in four minutes than any gear review ever did.
Mountains break most of the rules landscape photographers pick up shooting flatter country. The light arrives on a schedule that has little to do with your sunrise app, scale is hard to read in a flat photograph, haze can turn an epic panorama into gray mush if you do not understand what causes it, and altitude becomes part of the shot list, not just a detail of the hike in. This guide covers what leading trips through the Dolomites has taught me about timing alpenglow, planning a hut-to-hut sunrise, reading the "sea of clouds" mornings this range is famous for, and staying safe while doing it all with a camera bag on your back.
Key Takeaways
Mountain light runs on a different clock than flat-horizon light, and the Dolomites are a good place to learn exactly how.
| Point | Details |
|---|---|
| Alpenglow window | A brief, strongly colored phase that happens only while the sun is below the horizon, commonly lasting five to ten minutes before sunrise or after sunset |
| Golden hour apps lie a little | Sun-angle calculators assume a flat horizon; a ridge or valley wall can delay sunrise light or cut sunset light short at a real Dolomites shooting position |
| Altitude safety line | Acute mountain sickness risk rises above roughly 2,500 meters (8,000 feet), with a standard rule of no more than 300 meters (1,000 feet) of sleeping-altitude gain per night |
| The "sea of clouds" sunrise | A textbook temperature inversion: cold air pools in the valleys on clear, calm nights while a rifugio above the layer wakes up in clear light |
| Lens choice for scale | Wide angle shows true scale with a strong foreground anchor; telephoto compresses and stacks distant ridgelines using haze as a depth cue |
| WeShoot's one sunrise day | The 8 day Dolomiti Photo Tour builds its single dedicated sunrise shoot around Lago di Antorno, plus hut imagery at Passo delle Erbe |
Table of Contents
- Why the Dolomites are a masterclass in scale
- What alpenglow actually is (and isn't)
- Timing the light: why mountain horizons break golden hour calculators
- Hut-to-hut logistics for a sunrise shoot
- The science behind the sea of clouds sunrise
- Composing for scale: foreground, layers, and lens choice
- Taming and using haze in big mountain scenes
- Altitude safety for photographers
- Gear notes for alpine light
- When to go: season, weather, and access
- Frequently asked questions about mountain landscape photography
- Shoot the Dolomites with WeShoot
Why the Dolomites are a masterclass in scale
Scale is the first problem any photographer runs into in big mountains, and the Dolomites are a good classroom for learning to solve it. The range was inscribed as a UNESCO World Heritage Site in June 2009, covering nearly 142,000 hectares and counting eighteen peaks above 3,000 meters, topped by Marmolada at 3,343 meters. Those numbers matter less for trivia night than for composition: you are not photographing one mountain, you are photographing a wall of comparable peaks with nothing at a familiar human scale to anchor them.
The rock itself is part of the story too. The Dolomites are mostly Triassic sedimentary dolomite, shaped over a long stretch of geologic time by the Alpine orogeny, the same mountain-building event responsible for the Alps as a whole. That origin is why the peaks read so differently in a photograph than a volcanic range or a granite batholith does: the layered sedimentary structure produces vertical walls, sharp towers, and a pale, almost luminous rock color that turns dramatically pink and orange at the edges of the day. The rock is doing real work here, not just the sky.
What alpenglow actually is (and isn't)
Alpenglow gets thrown around loosely to describe almost any warm mountain light, but the strict definition is worth knowing because it changes how you plan a shoot. True alpenglow is an optical phenomenon that appears as a reddish glow opposite the sun, visible specifically while the solar disk sits just below the horizon. In other words, in the strict sense, it only happens before sunrise and after sunset, not during them. The light you are seeing is not direct sunlight hitting the peak at all, since the sun has no direct line of sight to the mountain once it has dropped below the horizon. What you are actually seeing is sunlight reflected or diffracted off airborne precipitation, ice crystals, or particulates in the lower atmosphere, bounced back onto the rock from somewhere the sun can still reach.
That mechanism is why alpenglow looks the way it does: a flatter, more diffuse rose or lavender tone rather than the punchier orange of direct sunrise light on a peak. It is also why it is so short lived. Once the sun clears the horizon and hits the rock directly, you have moved into ordinary golden hour, a different kind of light with a longer runway. If a shot depends on that specific rose colored glow, you need to be in position and ready before the sun comes up, not after.
Timing the light: why mountain horizons break golden hour calculators
Most golden hour planning apps are built around sun-angle conventions that assume a flat, unobstructed horizon. There is no single official astronomical definition of golden hour, but common photography-planning conventions place it somewhere between roughly 6 and 10 degrees above the horizon, with blue hour a few degrees below it, when the sun sits about 3 to 10 degrees under the horizon depending on the definition used. Those numbers work fine on a beach. They do not work the same way at a rifugio with a 2,000 meter wall of rock between you and the actual horizon.
In practice, a ridge or a valley wall can delay direct light reaching your subject well past an app's predicted sunrise time, or cut your evening light short before its sunset time. The warm color comes from the same physics either way: at a low sun angle, light crosses far more atmosphere, which scatters out more blue and leaves the red and orange tones that reach your lens. A mountain horizon just changes when and for how long that window is actually visible from where you are standing.
| Light phenomenon | When it happens | Typical duration | What it takes to catch it |
|---|---|---|---|
| Alpenglow | Strictly before sunrise or after sunset, sun below horizon | About 5 to 10 minutes | Being in position and ready beforehand, since it cannot be caught by reacting to it |
| Golden hour | Roughly 6 to 10 degrees above the horizon, lengthened or shortened by terrain | 20 to 40 minutes, variable at altitude | Knowing your specific viewpoint's real horizon, not just the app's flat-horizon time |
| Sea of clouds sunrise | Clear, calm mornings after a temperature inversion sets up overnight | A few hours after sunrise before the inversion breaks | Sleeping above the inversion line, usually at a rifugio |
| Blue hour | Sun roughly 3 to 10 degrees below the horizon | 20 to 30 minutes | A sturdy tripod and patience, since there are no sharp shadows to work with |
Pro Tip: Treat any sunrise or sunset app's time as the start of your window, not the moment to arrive. At a rifugio with a real skyline ahead of you, be set up at least thirty minutes early and watch the sky, not the clock, for when the color actually starts building.
Hut-to-hut logistics for a sunrise shoot
Almost every generic mountain photography article tells you to "arrive early" for sunrise. In the Dolomites, arriving early usually means arriving the night before, not the morning of. The best alpenglow and sea of clouds viewpoints sit near a rifugio, the network of mountain huts that let you sleep at altitude instead of hiking up in the dark with a headlamp and a loaded camera bag. Rifugios run a short summer season, offer dorm-style rooms rather than private suites, and the popular ones, especially anything known for a sunrise view, fill up well in advance. This is a planning decision made at the itinerary level, months out, not a same-day call.
This is the logic behind how we build a sunrise morning into our own Dolomiti Photo Tour. Out of an eight day itinerary built mostly around golden hour and sunset light, the one morning dedicated entirely to sunrise is Lago di Antorno, chosen because it is a viewpoint you can set up at before first light without an unreasonable overnight hike. The trip also spends a night near Passo delle Erbe, home to small huts scattered through alpine meadows, shooting sunset and night long exposures from the same base. The lesson generalizes well beyond this one trip: figure out your sunrise viewpoint first, then work backward to where you sleep.
The science behind the sea of clouds sunrise
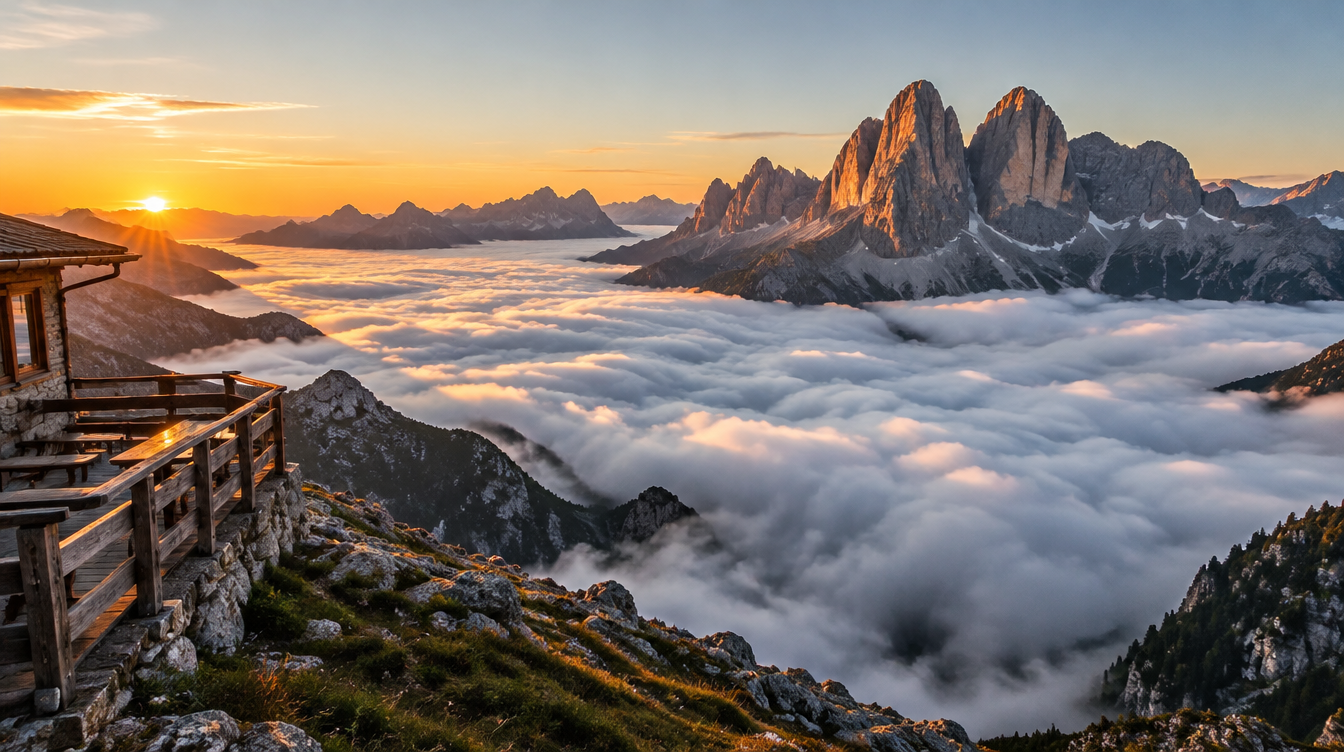
If you have seen a photograph from a Dolomites rifugio terrace with a flat, cottony layer of cloud filling every valley below while the peaks themselves sit in perfectly clear light, you have seen a temperature inversion. The mechanism is well understood meteorology, not a lucky accident: the National Weather Service describes an inversion forming when air near the ground cools faster than the air above it, which is most likely on a clear night with light or calm wind, and cools most readily in low places such as valleys sheltered from the wind. That cooling typically begins in the late afternoon or evening and lingers into the next morning for a few hours after sunrise, which is exactly the window a rifugio-based sunrise shoot is built to catch.
Practically, you are looking for the same conditions that make for a clean, high-contrast sunrise generally: clear skies overnight and little wind. Check the forecast the evening before, and if you are sleeping above the valley floor, there is a real chance you wake up to cold air pooled below you like a lake while your position stays in direct light. It will not happen every morning, but knowing the actual cause lets you read a forecast with real intent instead of just hoping.
Composing for scale: foreground, layers, and lens choice
A wide ridge of 3,000 meter peaks does not read as big in a photograph on its own. Scale is relative, and a flat image has no built-in sense of distance unless you give it one. The two tools that actually work in the Dolomites are a strong foreground anchor and a deliberate lens choice. A boulder, a hut roofline, a larch tree, or a hiker on a ridge gives the eye something at a known size to compare the peaks against, which does more for scale than simply getting more mountain into the frame.
Lens choice is a genuine trade-off, and it connects directly to the composition technique we cover in our guide to telephoto landscape photography. A wide angle shows the true breadth of a scene paired with that foreground anchor, letting you include the sweep of a pass like Passo Sella in one frame. A telephoto compresses distance and stacks ridgelines into layers, often the more dramatic read in the Dolomites because the haze between each ridge does real compositional work, which the next section covers.
Taming and using haze in big mountain scenes
Haze flattens an ambitious panorama into a gray wall if you fight it the wrong way, but understanding why it happens changes how you use it. The effect has a name, aerial perspective, and a known cause: as the distance between an object and the viewer increases, contrast between the object and its background decreases, and the object's color desaturates and shifts toward the color of the background, mostly as a result of light scattering in the air between you and the subject. That is why a distant ridge in the Dolomites so often reads as a pale, cool blue-gray while the foreground peak in the same frame stays richly colored and contrasty.
A circular polarizer can cut some atmospheric haze and is worth carrying, though it has real limits on an ultra-wide lens, where the effect turns uneven across the frame as the angle to the sun changes edge to edge. The more useful shift is treating haze as information rather than a flaw to eliminate. Ridgelines that get progressively paler and cooler toned with distance are exactly the depth cue a telephoto composition relies on. Stripping it all out with heavy dehazing can leave a mountain scene looking flat instead of three dimensional.
Altitude safety for photographers
This is the section most mountain articles skip, and it should not be. Altitude sickness is a real, well documented risk, and several Dolomites viewpoints and rifugi sit at or near the threshold where it matters. Acute mountain sickness typically begins to be a risk above roughly 2,500 meters, about 8,000 feet, though some people feel effects lower than that. The standard pacing rule: ascend no more than about 300 meters, or 1,000 feet, of net sleeping-altitude gain per day, often summarized as climb high, sleep low.
The U.S. National Park Service's guidance for Rocky Mountain National Park puts it plainly: everyone is susceptible to altitude sickness above 8,000 feet, with mild symptoms including headache, rapid pulse, and nausea, and severe symptoms including loss of balance, slurred speech, and confusion. Their field rule: climb as high as you like during the day, but do not sleep more than 1,000 feet higher than the night before. For anything beyond mild symptoms, the only dependable fix is immediate descent, not pushing through for one more shot.
Pro Tip: Treat an unresolved headache at altitude as a hard stop, not a nuisance to shoot through. Descending is the one thing that reliably works, so the decision to turn back is almost never wrong.
None of this makes the Dolomites a dangerous destination for an ordinary photography trip. Most popular viewpoints and rifugi sit well below the altitudes where mountaineers worry about the more serious forms of altitude sickness. It does mean a heavy camera bag, short breath, and one more pre-dawn shot are worth taking seriously, especially coming from sea level with no acclimatization.
Gear notes for alpine light
Mountain photography does not need a completely different kit, but a few things matter more here than on flatter terrain. Cold drains batteries noticeably faster at altitude and before dawn, so carry at least one spare kept warm in an inside pocket rather than your bag's outer compartment. A genuinely stable tripod earns its weight on an exposed ridge or pass, where wind is a near constant, and a few extra seconds weighting the tripod with your bag is cheaper than a blurred long exposure.
Pack both a wide angle and a telephoto in the 70 to 200mm range if you can manage the weight, since the two solve different problems here, as covered above. A circular polarizer is worth the extra ounces for cutting haze and controlling reflections on lakes like Lago di Antorno, but check its effect through the viewfinder first, since an aggressive polarizing angle on a wide scene can leave an uneven, patchy sky that is harder to fix in post than to simply dial back in the field.
When to go: season, weather, and access
Rifugio season is short, generally running through the warmer months when huts are staffed and reachable, which is the first constraint on any hut-based sunrise plan. Within that window, late spring brings wildflower meadows and lingering snow on the higher peaks, while late summer and early autumn bring the clearest, most stable weather for both alpenglow and sea of clouds mornings, since both depend on calm, clear conditions overnight. A run of settled, high-pressure days with light wind is worth more than any single calendar date, so build flexibility into a trip rather than locking in one specific morning months out.
Access matters as much as timing. Many of the most photographed Dolomites viewpoints, including the major passes, are reachable by road or a short walk, while true hut-to-hut sunrise positions need a planned hike and a booking well ahead of your travel dates. Deciding which kind of shot you are chasing, drive-up pass light or rifugio sunrise, should shape your itinerary from the start rather than get worked out after you land.
Frequently asked questions about mountain landscape photography
What exactly is alpenglow, and how is it different from a normal sunset? True alpenglow is indirect light, reflected off airborne particles, visible only while the sun sits below the horizon, which is why it shows up as a brief, cool-toned glow before sunrise and after sunset, not during either.
How long does the best alpenglow light actually last? Commonly five to ten minutes, which is why the real challenge is being in position and ready beforehand rather than reacting to it once it starts.
Why does a golden hour app sometimes get the light wrong in the Dolomites? Those calculators assume a flat horizon and ignore a ridge or valley wall blocking the real one, so usable light at a specific rifugio or pass can start later or end earlier than predicted.
Do I need to worry about altitude sickness on a Dolomites photo trip? Risk rises above roughly 2,500 meters, or 8,000 feet, which several viewpoints and rifugi reach or approach. The standard precaution is pacing sleeping-altitude gains at no more than about 300 meters a night and treating a persistent headache as a reason to stop ascending rather than push for the shot.
What causes the sea of clouds sunrise photos from Dolomites huts? A temperature inversion. On clear, calm nights cold air pools in the valleys while a warmer layer sits above, so a rifugio above that line wakes up to clouds filling the valleys while the peaks stay in clear light.
How do I deal with haze flattening distant peaks in a big panorama? Haze is aerial perspective, caused by light scattering with distance. A polarizer helps some, but it is often more effective to use the hazier, cooler ridgelines as a depth cue instead of removing them.
Do I need to book a mountain hut in advance for a sunrise shoot? Generally yes. Rifugios run a short summer season with limited dorm-style capacity, and the ones known for sunrise views fill up well ahead, so this is a trip-level decision rather than something sorted out on arrival.
Shoot the Dolomites with WeShoot
Reading about alpenglow timing and inversion mornings only gets you so far. Being positioned at the right rifugio or pass before the light happens is what actually produces the photograph, and that is the part a guided trip solves for you. Our Dolomiti Photo Tour is an eight day, seven night itinerary through Alpe di Siusi, Seiseralm, Passo Sella, Passo Gardena, Passo Giau, Lago di Antorno, Passo delle Erbe, and Tre Cime di Lavaredo, built around golden hour and sunset light most days with one dedicated sunrise morning at Lago di Antorno. The Passo delle Erbe night includes shooting among small huts in alpine meadows, sunset and night long exposure from the same base, as close as a scheduled itinerary gets to the hut logistics covered above.
The trip runs at moderate difficulty, with trail hikes up to about an hour, shared accommodation with a single supplement available, and coaching and image review built into each day, plus a post-processing workshop. It starts and ends at Venice Marco Polo Airport, with ground transportation, transfers, and breakfasts included. If chasing light like this in a range this scale sounds like more coordination than you want to handle solo, that coordination is exactly what the trip takes off your plate.
Sources
- Dolomites: Wikipedia entry on UNESCO World Heritage status, area, peak count, and geology
- Alpenglow: Wikipedia entry on the definition, mechanism, and timing of alpenglow
- Golden hour (photography): Wikipedia entry on sun-angle conventions and the color physics of low-angle light
- Aerial perspective: Wikipedia entry on atmospheric haze, contrast loss, and desaturation with distance
- Altitude sickness: Wikipedia entry on acute mountain sickness thresholds, ascent-rate guidance, and treatment
- U.S. National Park Service, Rocky Mountain National Park: acute mountain sickness symptoms and field guidance
- NOAA National Weather Service (Little Rock, AR forecast office): explanation of temperature inversions