Ice Cave Photography in Iceland: What It Actually Takes to Get Inside
Why Iceland's natural ice caves can only be safely photographed with a licensed glacier guide, the real glaciology behind their deep blue color, and the camera settings that handle their low light interior.
Ice Cave Photography in Iceland: What It Actually Takes to Get Inside
Every winter I get some version of the same email before a group trip to Iceland. Someone has seen a photo of a glowing blue ice cave, usually on Instagram, and wants to know which road leads to "the" cave. The honest answer is that there is no road and no fixed cave. The picture they are looking at was almost certainly taken by someone standing next to a glacier guide who had checked that exact tunnel for safety a few hours earlier. Ice cave photography is one of the few genuinely bucket list images you cannot DIY your way into, and understanding why makes you a better photographer once you are actually standing inside one.
This guide covers the part nobody puts in the caption: why these caves exist at all, why they are different every single season, why guided access is not a sales pitch but a basic safety requirement, and the actual camera settings that handle the deep, saturated blue light you will be shooting in. If you have already read our Iceland Winter Photography Guide, think of this as the deep dive on the single hardest location in that itinerary to photograph well.
Key Takeaways
Ice caves are temporary meltwater tunnels inside a moving glacier, which is exactly why they can only be visited with a licensed guide and why the settings that work inside one are different from almost anything else you will shoot in Iceland.
| Point | Details |
|---|---|
| Why you need a guide | Ice caves form from meltwater and sit inside actively moving glacier ice, which national park and glacier safety authorities classify as inherently dangerous terrain |
| Why the blue color happens | Compression squeezes air bubbles out of old glacier ice, and bubble free ice absorbs red light while letting blue pass through |
| Why caves are never the same twice | A cave is a tunnel carved by moving meltwater through ice that is itself shifting, so the shape you photograph this winter may not exist by the next one |
| Best season | Winter, roughly November through March, when natural caves are stable enough for guided access |
| Starting settings | Manual exposure, RAW, a tripod, and a deliberately cool or neutral white balance rather than auto |
Table of Contents
- Why you can't just drive up to an ice cave
- How ice caves actually form, and why they don't last
- Why a cave you photographed last winter might already be gone
- Getting in: guided access and why it matters
- What your guide provides vs. what you bring
- The science of the blue: why glacier ice looks that color
- Camera settings for a deep blue, low light interior
- Composition inside an ice cave
- Cold weather gear and camera care on the glacier
- Best time of year for ice cave photography
- What a guided ice cave excursion is actually like
- Frequently asked questions about ice cave photography
- Planning your own ice cave photography trip
Why you can't just drive up to an ice cave
I understand the instinct. You rented a 4x4, you have studded tires, and the glacier is right there past Jökulsárlón. Surely you can just walk up and find an opening. The problem is not the drive, it is what happens once you are standing on the ice itself. An ice cave sits inside a glacier that is constantly moving, cracking, and shedding material, and the U.S. National Park Service's own guidance on glacier ice caves is blunt about it: this kind of terrain is inherently dangerous, with real risk from falling ice, sudden rockfall, and hidden crevasses that a visitor has no way of spotting from the surface.
That is also why nobody in this business will give you GPS coordinates for a specific cave. A licensed glacier guide checks a given tunnel before every single group goes in, assessing the ceiling, the floor, and whether meltwater activity has changed anything since the last visit. That daily judgment call is the actual product you are paying for, far more than the four wheel drive vehicle or the crampons. Treat any blog post that tells you exactly where to park and walk in unaccompanied as a liability you do not want, not a shortcut.
Pro Tip: If a tour operator's photos look suspiciously identical to ones you have seen from a completely different company, it is often the same cave on the same week, because there are only a handful of stable enough tunnels open at any given time in a given season. That is normal. It is not a sign you are being shown something fake.
How ice caves actually form, and why they don't last
An ice cave is not a hole someone dug. It is a tunnel that meltwater carves through the body of a glacier, typically starting where surface water finds a weak point and drains downward and sideways through the ice instead of running off the top. The National Park Service's own writeup on glacier ice caves describes exactly this mechanism: the passages are cut by running water moving through ice that is itself in constant motion, which is a completely different process from a cave forming in rock. A rock cave can sit unchanged for thousands of years. A glacier ice cave is being actively undone by the same water that built it, on a timescale of months, not millennia.
That single fact explains almost everything else in this article. The ceiling you are photographing today is thinner than it was last month, because meltwater has been working on it from above and the glacier itself has been sliding downhill the entire time. Guides track this. Casual visitors have no way to.
Why a cave you photographed last winter might already be gone
One of the more sobering things I tell photographers before their first ice cave visit is that the specific cave in the photo they are chasing from last year's trip report might not exist anymore. According to NPS research on glacier collapse dynamics, collapses cluster heavily around the period of peak meltwater activity, when pressure from water moving through the ice destabilizes passages that looked stable only weeks before, and that pattern is expected to become more common as glaciers lose mass faster. NASA's long running satellite tracking of the planet's ice sheets backs up the scale of that change: by NASA's own accounting, the world's major ice systems have been losing mass at a measurable, sustained rate for more than two decades of satellite observation.
None of this means ice caves are disappearing overnight or that you should cancel your trip. It means you should stop treating a specific cave as a fixed location on a shot list and start treating "ice cave season" as a window during which guides find, assess, and open whatever tunnels the glacier happens to have produced that year. The exact cave changes. The photographic opportunity does not.
Getting in: guided access and why it matters
In practice, every legitimate ice cave excursion in Iceland works the same way. A licensed glacier guide inspects the cave before your group ever sees it, issues you a helmet and crampons, and walks the group in and out as a unit. This mirrors the core principle the National Park Service states plainly for its own glacier ice caves: inexperienced visitors should treat this terrain as hazardous, requiring professional judgment, not a casual walk. There is no shortcut version where you save money by skipping the guide and finding your own entrance. The guide is the safety system, not an optional upgrade.
This is also why ice cave excursions sell out and why most photographers book them as a dedicated add on rather than a drive-by stop. Group sizes inside a cave stay small on purpose, both for safety and because a cramped ice tunnel with twenty photographers in it is a bad experience for everyone holding a camera.
What your guide provides vs. what you bring
Most first-time visitors overpack for this one, worried they will show up without some piece of specialized glacier gear. In reality the split between what is issued and what you are responsible for is fairly simple.
| Guide typically provides | You bring yourself |
|---|---|
| Crampons sized to your boots | Sturdy, waterproof winter hiking boots |
| Helmet | Base layers and a proper insulated winter jacket |
| Route assessment and safety supervision | Camera, lenses, and spare batteries (batteries drain fast in the cold) |
| Group transport to the glacier access point | A tripod if you plan to shoot longer exposures inside the cave |
| Entry and exit timing decisions | Lens cloths, since condensation on glass is constant moving between cold air and your own breath |
A wide zoom in the 16 to 35mm range covers most of what you need inside a cave, since space is tight and you are usually shooting the ceiling, an ice window, or a companion for scale rather than a distant subject. A second, faster prime is worth having for the darker back sections of a longer tunnel.
The science of the blue: why glacier ice looks that color
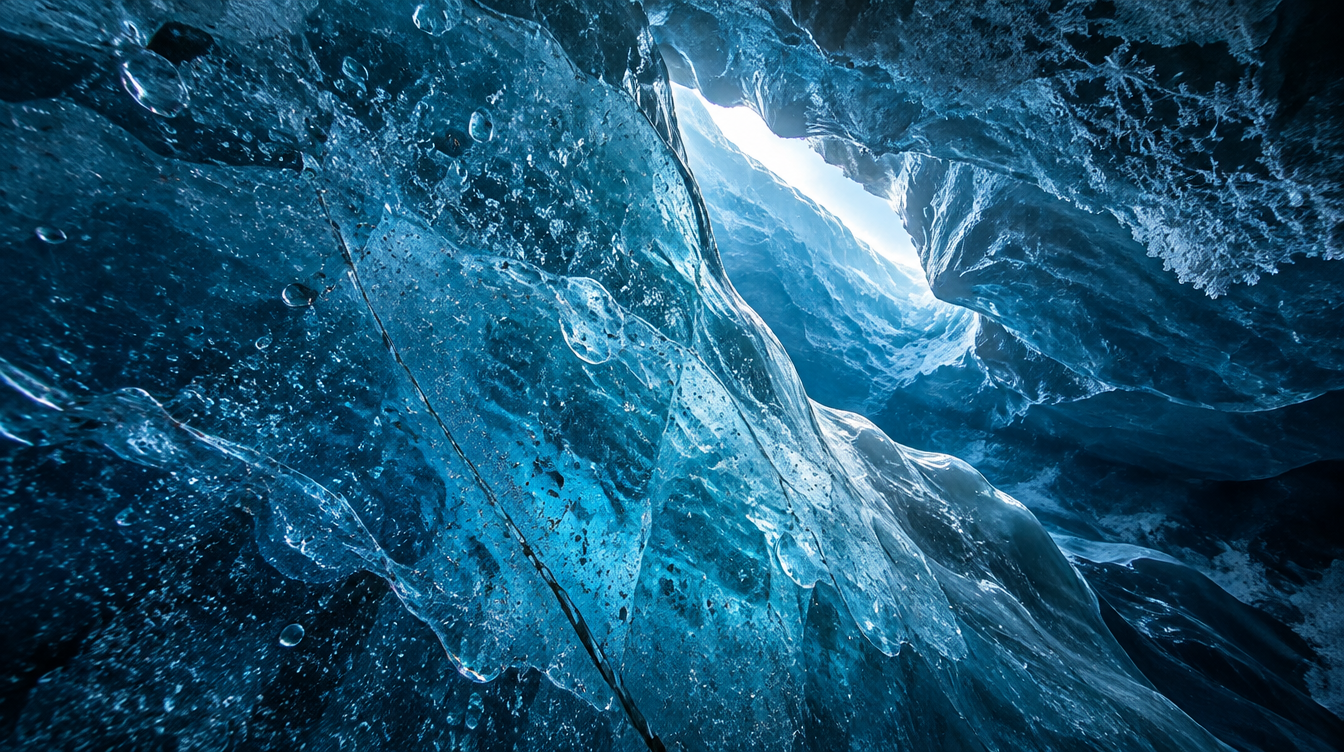
The blue inside an ice cave is not a filter, a flash gel, or an editing trick, and it is worth understanding the actual mechanism because it changes how you should expose and white balance your shots. According to NASA's explanation of glacier ice color, glacier ice forms under enormous pressure over long periods, and that pressure squeezes nearly all of the air bubbles out of the ice. Ordinary snow and young ice are full of tiny air bubbles that scatter every wavelength of light roughly equally, which is why they look white. Old, compressed, bubble-free glacier ice behaves completely differently: it absorbs red light and lets blue light pass through or scatter back toward your lens, which is why the deepest, oldest ice in a cave reads as a rich, saturated blue rather than the white or grey you might expect.
The practical result is that the deeper and older the ice around you, the more saturated the blue gets, and ceilings with fewer visible air bubbles will consistently read bluer than a nearby section riddled with white streaks. If you are chasing the most dramatic color, look for the cleanest, most bubble-free ice rather than assuming the whole cave reads the same.
Camera settings for a deep blue, low light interior
Shooting inside an ice cave is a genuinely different lighting problem than almost anything else in Iceland, because you are working with ambient light filtered through several feet of blue ice rather than open sky, and the dynamic range between a bright entrance and a dim interior can be extreme in the same frame. Here is the starting point I give photographers on our trips before they go in:
Shoot in manual exposure and RAW, always. Auto exposure modes will often try to neutralize the blue cast as if it were a white balance error, which is the last thing you want. Set your white balance manually to something in the 4000 to 5000K range as a starting point, cooler than you would use outdoors, and adjust from there in the field by chimping your results rather than trusting the preview on a bright screen. For exposure, start around f/8 to f/11 if you want both the ice texture in the foreground and the cave opening reasonably sharp, with ISO pushed up to whatever your camera handles cleanly in dim conditions, often 800 to 1600 depending on the body, and a shutter speed slow enough to gather light without blurring handheld, which is exactly where a tripod earns its weight. If you want a silky look on any dripping meltwater inside the cave, the same long exposure habits that work for waterfalls apply, something we cover in more technical depth in our long exposure guide from Val d'Orcia: lock the camera down, use a remote shutter or timer to avoid shake, and bracket your shutter speed rather than guessing once.
When the entrance is visible in frame, expect genuine high dynamic range: the opening can read several stops brighter than the deep interior. Expose for the ice detail you actually want and accept that a bright opening may clip, or shoot a quick bracket of exposures if your guide's schedule allows it, since blending later is far easier than trying to recover a blown highlight from a single frame.
Composition inside an ice cave
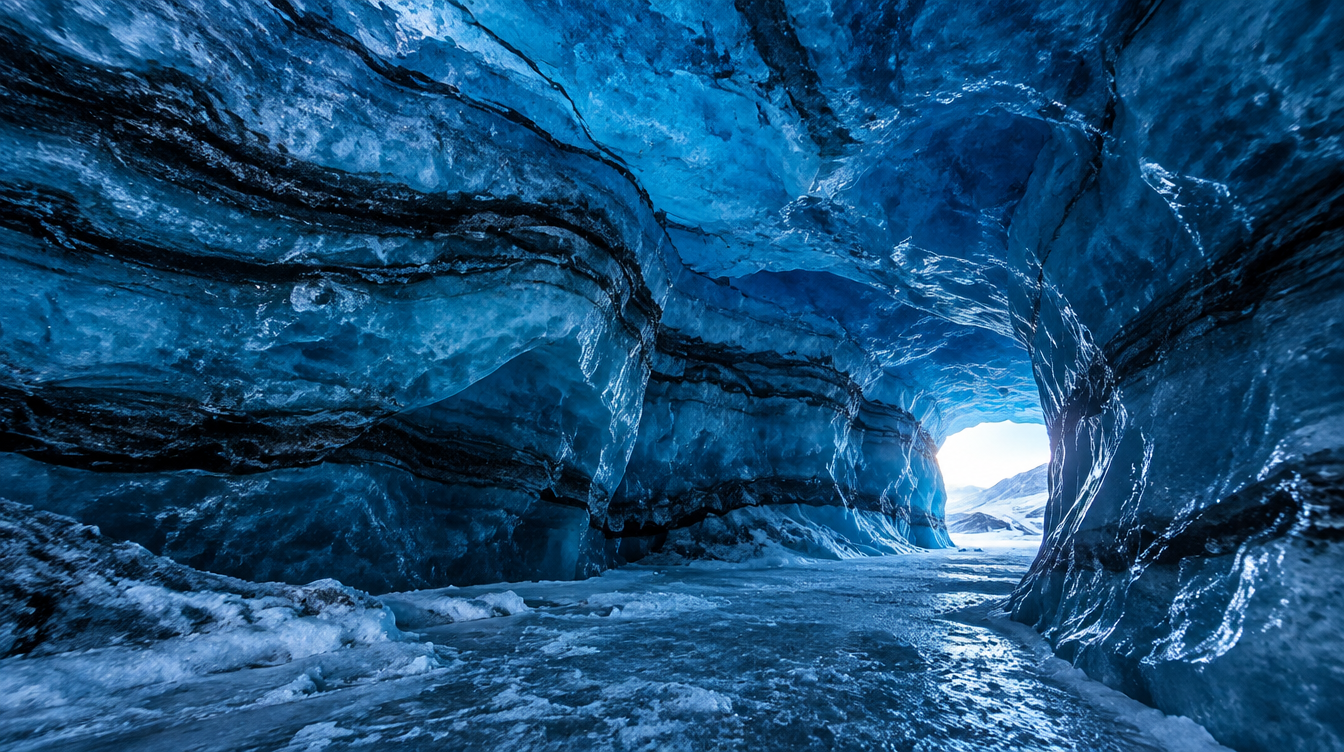
Space inside most caves is tight, so your compositional choices are narrower than on an open landscape shoot. Framing the entrance from deep inside the tunnel, with the opening reduced to a bright wedge of daylight against the blue walls, is the single most reliable shot in this kind of location, and it is popular for a good reason: it shows scale and tells the viewer immediately what kind of space this is. A person standing near that opening, even a fellow traveler rather than a model, gives the frame a sense of size that an empty tunnel struggles to convey on its own.
Look up as often as you look forward. The ceiling is often where the cleanest, most striated blue ice is visible, and a wide lens pointed straight up can turn an ordinary tunnel shot into something more abstract and striking. Where the ice has trapped layers of ash or sediment from past volcanic activity, those darker bands running through the blue are worth isolating as their own composition, a visible record of the glacier's own history layered right in front of you.
Cold weather gear and camera care on the glacier
Batteries lose charge fast in sub-freezing temperatures, so carry at least one spare in an inside jacket pocket where your body heat keeps it warmer, and swap it in as soon as you notice the first battery dropping fast. The bigger practical issue is actually condensation, not cold itself: moving a cold camera into a warm vehicle or hut causes moisture to form on and inside it, a bigger long term risk to your gear than the cold ever was. Let your camera acclimate slowly inside a sealed bag before bringing it into a heated space.
Pro Tip: Keep your spare batteries and memory cards in an inner pocket, not your camera bag's outer compartments. The few degrees of extra warmth against your body genuinely extends battery life on a long, cold shoot.
Best time of year for ice cave photography
Natural ice caves are, broadly, a winter phenomenon, roughly November through March, which lines up with the same window covered in our guide to golden hour photography in Iceland and in the Day 85 pillar guide above. Earlier in that window, caves are often freshly formed and still being assessed by guides as safe for entry. By late winter, the same meltwater and pressure dynamics discussed above start working against cave stability again as temperatures begin to climb, which is part of why access windows shift from year to year rather than following a fixed calendar date. Outside of winter, meltwater volume rises sharply and makes natural caves unstable, which is the core reason this is not a year-round activity the way a glacier lagoon visit is.
If your trip dates are flexible, build in a buffer day around your planned ice cave excursion. Weather and glacier conditions change quickly, and operators will reschedule rather than run a trip into a tunnel they are not confident about that day. That flexibility is a feature of a responsible operator, not a flaw in your itinerary.
What a guided ice cave excursion is actually like
A typical day starts with a meeting point near the glacier, usually not far from the Jökulsárlón area covered in our Jökulsárlón and Diamond Beach guide, where your guide fits everyone with crampons and a helmet before a walk of fifteen minutes to an hour across the glacier surface to reach that season's accessible cave. Once inside, groups move slowly and stop often, since this is as much a photography stop as a hike. A guide who has done this daily for a season knows where the light is strongest at a given hour and will often hold the group at a particular spot specifically because the photography is better there, which is the biggest advantage of going with someone who does this for a living.
This is exactly the kind of day our Iceland Winter Aurora photo tour is built around. The seven day, seven night trip spends real time in this same glacier lagoon region, with a professional photographer guide, Lorenzo Ranieri Tenti or Marco Carotenuto depending on your departure, working alongside a maximum of ten travelers so nobody is fighting for a tripod spot at golden hour. The tour itself covers Jökulsárlón, Fjallsárlón, Diamond Beach, and the rest of the itinerary's winter highlights, and because your guide works with licensed local glacier operators, arranging an ice cave excursion to pair with the rest of your Iceland photography is a natural add on rather than something you have to figure out cold, booking through an unfamiliar operator on your own.
Frequently asked questions about ice cave photography
Can you visit ice caves in summer? Generally no. The same meltwater that carves these tunnels runs far heavier in summer, destabilizing natural caves well before winter arrives. A cave experience outside the winter window is typically a man-made ice tunnel rather than a natural glacier cave, a different product entirely.
Is ice cave photography safe? With a licensed guide, reasonably so, since the guide's job is to manage the risks that glacier safety authorities warn about: falling ice, unstable ceilings, and hidden structural weak points you cannot see from outside. Without a guide, this is genuinely hazardous terrain, not a hiking trail.
Do you need special gear? Your guide supplies the glacier-specific equipment: crampons and a helmet. You are responsible for warm, waterproof clothing, sturdy boots, and your own camera gear, including spare batteries that you keep warm in an inner pocket.
Can beginners do this, or do you need climbing experience? A standard, guided walk-in ice cave excursion requires no climbing or mountaineering background. You walk in on crampons at a guided pace. It is physically a moderate winter walk, not a technical climb.
What actually causes the blue color? Compression over time squeezes air bubbles out of glacier ice. Ice without those bubbles absorbs red light and lets blue light through, which is why old, dense glacier ice reads blue while fresher snow and young ice look white.
Why doesn't the same cave look the same from one year to the next? Because it is not a fixed feature. It is a tunnel cut by moving water through ice that is itself sliding and shifting, so both the water and the ice around it keep reshaping the space year over year.
Why can't you just explore the glacier and find your own cave entrance? Because the risks that make this terrain dangerous, hidden crevasses, unstable ceilings, and sudden collapse, are not reliably visible to someone without glaciological training, which is exactly the judgment a guide is trained to make before anyone enters.
What camera settings should I start with inside a cave? Manual exposure, RAW capture, a deliberately cool white balance around 4000 to 5000K rather than auto, an aperture around f/8 to f/11 for depth, and whatever ISO your camera handles cleanly in low light, paired with a tripod if you want sharp detail at a slower shutter speed.
Planning your own ice cave photography trip
Ice cave photography rewards patience more than almost anything else you will shoot in Iceland. You cannot scout it in advance from home, you cannot guarantee the exact cave from someone else's trip report, and you genuinely cannot do it safely without a guide standing next to you making calls about the ice in real time. What you can control is showing up with the right settings dialed in, a tripod in hand, and realistic expectations about a location that is, quite literally, reshaping itself every season.
If this is the piece of your Iceland trip you are most excited about, build your whole itinerary around the same winter window and the same glacier region. Our Iceland Winter Aurora tour puts you in that region for a full week with a guide who photographs it for a living, which turns one bucket list stop into a trip's worth of consistently strong images.
Sources
- NASA Science: why glacier ice appears blue
- NASA Science: Earth Indicators, ice sheet mass loss
- U.S. National Park Service: how glacier ice caves form and why they are hazardous
- U.S. National Park Service: falling ice and glacier safety guidance
- U.S. National Park Service: glacier collapse dynamics