How to Shoot Star Trails: Single Exposure vs Stacking
A practical guide to photographing star trails: finding your celestial pole, choosing between one long exposure and a stacked sequence, and the intervalometer, dew, and battery details that make or break a night under the stars.
How to Shoot Star Trails: Single Exposure vs Stacking
The first time I tried star trails for real, I was on a dune in the Algerian Sahara with a camera pointed north, convinced one perfect two hour exposure would hand me a clean set of circular arcs around Polaris. A jeep's headlights swept across the frame at hour one. I had no backup. That single mistake taught me more about star trail photography than any tutorial had, and it is the reason I now shoot almost every star trail as a stack of shorter frames rather than one long gamble.
This guide covers both methods honestly: when a single long exposure still wins, when stacking saves you, the settings that actually work, and the field problems, dew, batteries, stray headlights, that no settings table warns you about.
Key Takeaways
Star trails come from Earth's own rotation, not a camera trick, and the method you choose should match the conditions, not just habit.
| Point | Details |
|---|---|
| What causes the trails | Earth's rotation makes stars trace circular paths (diurnal circles) around a celestial pole over the course of an exposure |
| Northern hemisphere aim point | Polaris, which sits only about 0.66 degrees from the true north celestial pole |
| Southern hemisphere aim point | The south celestial pole has no bright marker star, so you locate it using the Southern Cross and the Pointers |
| Single exposure vs stacking | A single exposure is simpler and gives a more organic look, but one mistake ruins the whole shot; stacking trades simplicity for control and recoverability |
| The intervalometer trap | Your set interval must be longer than the camera's actual exposure time, or frames get dropped and trails break |
| Field enemy number one | Dew on the front element, solved by keeping the lens warmer than the surrounding air's dew point |
Table of Contents
- What causes star trails
- Finding your pole: Polaris vs the south celestial pole
- Single exposure vs stacking: which should you choose
- Camera settings for star trails
- Intervalometer settings for stacking
- Managing dew, condensation, and batteries in the field
- Stacking workflow: StarStaX and the Photoshop alternative
- Common mistakes
- Frequently asked questions about star trail photography
- Where to shoot: dark sky deserts
What causes star trails
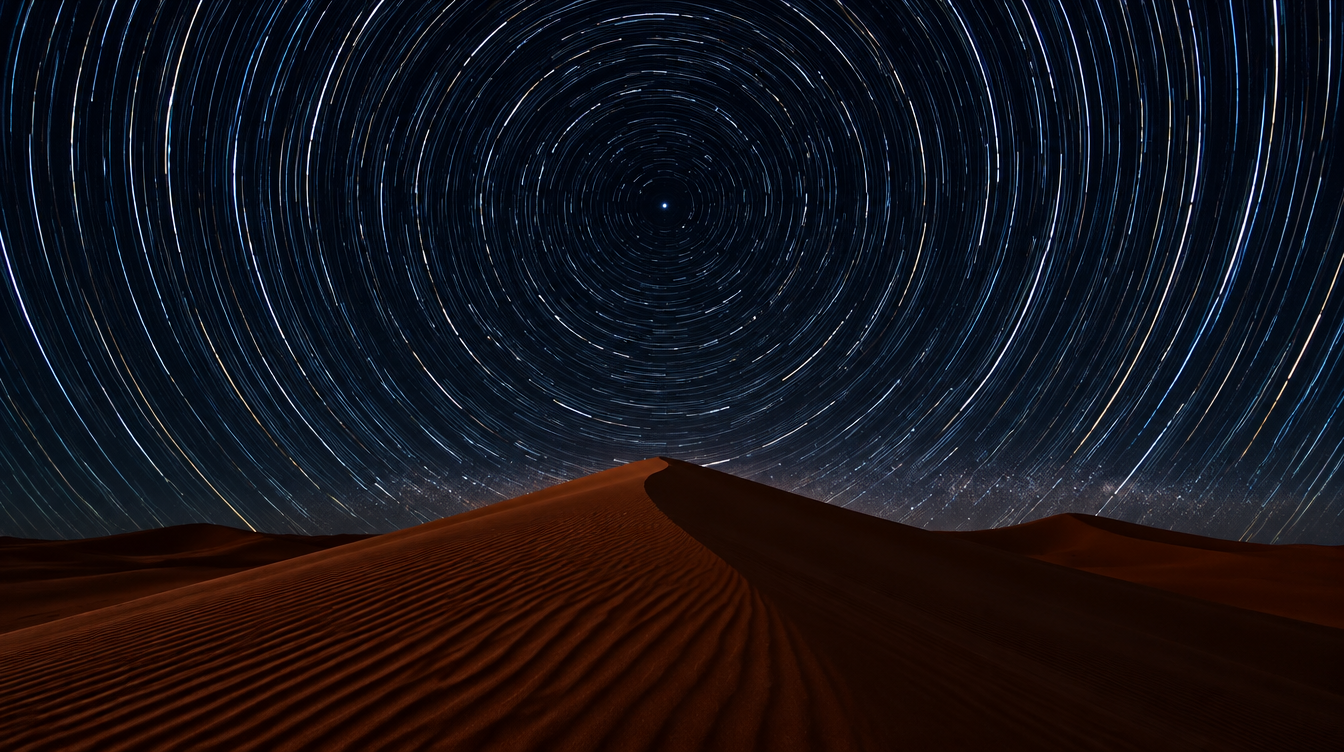
Star trails are not a lens or sensor effect. They are the Earth turning underneath a fixed camera. Leave the shutter open long enough and every star records as an arc rather than a point, because the planet rotates roughly 15 degrees every hour while your sensor stays still. Astronomers call the paths stars trace diurnal circles, and a star trail photograph is simply a long enough exposure to make those circles visible (Wikipedia's entry on star trails covers the technique and its history, including the 1931 Sudbury Skinner photograph often credited as one of the earliest deliberate attempts).
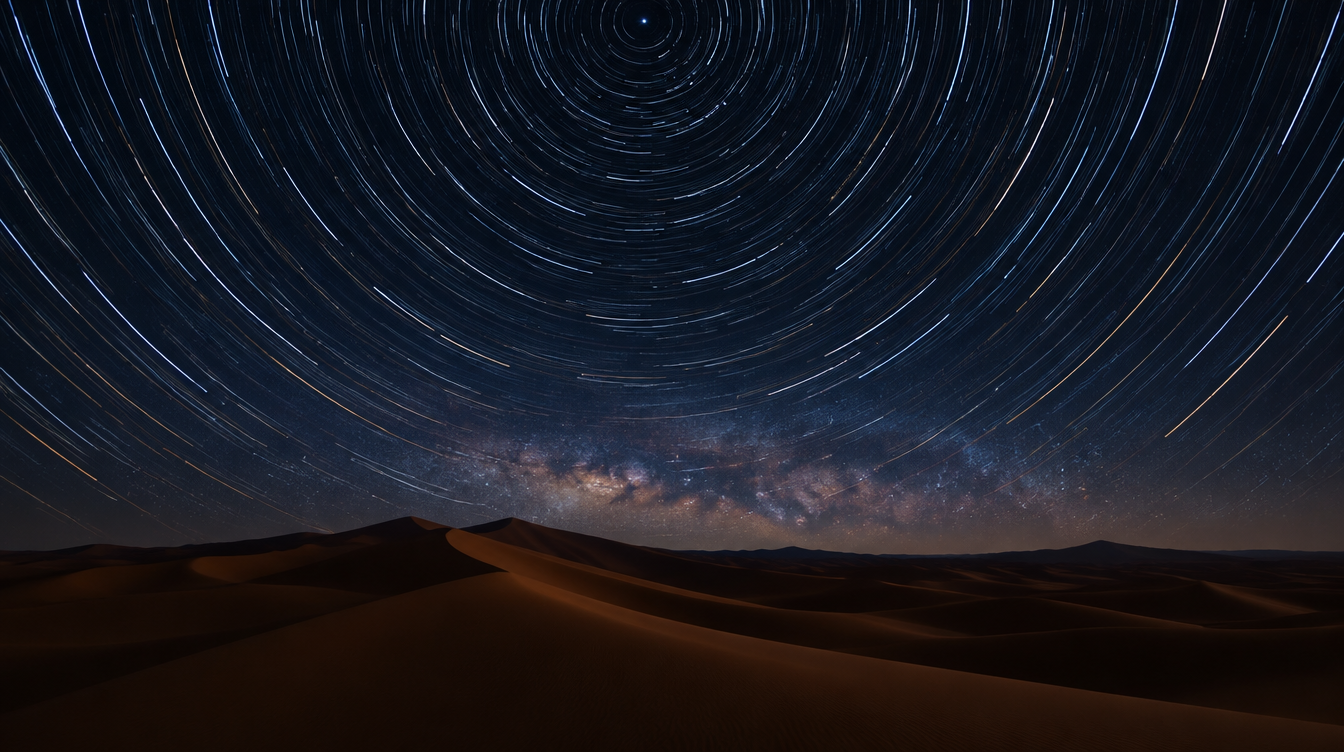
Where you point your lens changes the shape you get. Aim at a celestial pole, the fixed point the sky appears to rotate around, and stars trace tight, nested circles. Aim east or west, toward the celestial equator instead, and the same rotation produces long, nearly straight streaks because you are watching stars rise or set rather than circle. Stars closer to the pole trace shorter arcs than stars farther from it in the same exposure, since every star is moving at the same angular rate but tracing circles of different radii (Wikipedia's page on circumpolar stars lays out exactly why proximity to the pole determines both a star's arc length and whether it ever dips below your horizon at all). If you have already read our field guide to photographing the Milky Way, this is the same sky, just captured on a completely different timescale: seconds there, hours here.
Finding your pole: Polaris vs the south celestial pole
In the Northern Hemisphere you have an unfair advantage: Polaris sits only about 0.66 degrees, roughly 40 arcminutes, from the true north celestial pole, close enough that centering on it looks essentially perfect to the eye (Wikipedia's entry on Polaris notes it will drift even closer, to about 0.45 degrees, shortly after the year 2100, as part of a roughly 26,000 year precession cycle that slowly swaps which star sits near the pole). Finding it is simple: locate the Big Dipper, follow the two stars at the end of its "bowl" outward, and they point almost directly at Polaris (NASA's explainer on the North Star walks through this pointer-star method and confirms Polaris sits "more or less directly above Earth's north pole along our planet's rotational axis").
The Southern Hemisphere is less forgiving. There is no bright star anywhere near the south celestial pole, a fact NASA states plainly: "the Southern Hemisphere doesn't have a bright star that marks the south celestial pole" (same NASA source as above). Southern-hemisphere photographers instead use the Southern Cross: extend an imaginary line along its long axis about four and a half times its own length, then cross-check against the two bright Pointer stars (Alpha and Beta Centauri) to triangulate the pole's rough position. It will never be as exact as locking onto Polaris, but for a star trail photograph, being close enough to keep the arc centers inside your frame is all you actually need.
Pro Tip: Do not obsess over pixel-perfect pole centering. Being a little off just shifts where the circle's center sits in your frame, it does not break the shot. Spend your planning time on finding a foreground that gives the arcs something to circle around, a lone tree, a dune ridge, a ruin, rather than hunting for an exact coordinate.
Single exposure vs stacking: which should you choose
This is the decision that actually matters, and most guides pick one method and barely mention the other. Both are legitimate. They solve different problems.
A single long exposure, often thirty minutes to several hours on Bulb mode, gives you one continuous, organic looking trail with no risk of visible gaps between frames. It is simpler to execute and there is nothing to stitch together afterward. The cost is that it is a single bet: a car's headlights, a flashlight from another guest, a sudden cloud bank, or your own tripod getting nudged ruins the entire exposure with nothing to fall back on. Noise also accumulates steadily across one very long exposure, and your battery drains the entire time with no chance to swap it mid-shot.
Stacking solves exactly those weaknesses. You shoot dozens or hundreds of shorter frames, typically twenty to thirty five seconds each, back to back, then blend them in software afterward so the star positions accumulate into one continuous-looking trail. If a plane crosses frame 47 of 300, you exclude that one frame rather than losing the whole session. Each frame stays clean, since you never push one exposure long enough for heat and sensor noise to build up the way a single multi-hour frame does. The ISS astronaut Don Pettit, who pioneered a lot of this technique from orbit, found that about thirty seconds was the longest exposure his cameras could manage well, so he stacked many thirty second frames instead of one long exposure (documented on Wikipedia's star trail page). The tradeoff: stacking needs an intervalometer, more time at the computer afterward, and one more piece of software to learn.
| Factor | Single long exposure | Stacked frames |
|---|---|---|
| Setup complexity | Low, set it and wait | Higher, needs an intervalometer and a plan |
| Risk if something goes wrong | High, one mistake ends the shot | Low, discard the bad frame and keep going |
| Noise control | Builds up over the full exposure | Each short frame stays cleaner |
| Battery management | No safe way to swap mid-exposure | Can swap between frames |
| Handling light pollution or moonlight | Bakes the brightness in for the whole duration | Easier to manage frame by frame |
| Post-processing work | Minimal, the file is already done | Requires a stacking pass in software |
| Best for | Very dark skies, short sessions, minimal interruption risk | Longer sessions, less predictable conditions, beginners who want a safety net |
My rule after years of leading night shoots: under forty five minutes of genuinely dark, still conditions, I will sometimes run one long exposure. Anything longer, or anywhere I cannot control foot traffic and headlights, I stack every time.
Camera settings for star trails
Whichever method you choose, the starting settings are close to identical, because each individual frame still needs to record stars as bright, sharp points before motion stretches them into trails over the full sequence. Shoot in full manual mode on a sturdy tripod, since a tripod and manual control is the baseline the U.S. National Park Service recommends for night sky photography generally (NPS Acadia's night skies photography guide states plainly that "taking images using a tripod and a camera with manual settings generally produces the best results"). Use the widest aperture your lens offers, start ISO around 400 to 800 and adjust from there depending on sky darkness and moon phase, following the same baseline NPS gives for pinpoint star shots before you stretch them into trails (their guide suggests starting "ISO at 400 and adjust higher as needed," with a shutter speed in the 10 to 20 second range for sharp, non-trailing stars, exactly the range you want for each individual frame in a stack).
Shoot RAW, not JPEG, so you keep full control over white balance and shadow recovery later. Switch to manual focus and lock it once you have nailed infinity on a bright star or distant light, since autofocus will hunt uselessly in the dark and can shift focus between frames if left on. Turn off in-camera long exposure noise reduction for a stacked sequence specifically, because it processes a dark frame after every exposure and can double your effective capture time per frame, opening visible gaps in the final trail. For white balance, there is a genuine split among experienced night shooters between a cooler, more "space" looking tungsten setting and a warmer daylight setting that keeps the sky closer to how your eye actually perceives it; shoot RAW and you can decide later rather than committing in the field.
Pro Tip: Take one test frame at a much higher ISO, say 6400, before committing to your real sequence. It will be noisy and unusable as a final image, but it lets you check focus, framing, and exposure in seconds rather than discovering a crooked horizon forty minutes into a stack.
Intervalometer settings for stacking
An intervalometer is what makes stacking practical. It is a simple accessory, often built into modern camera firmware now, that triggers your shutter on a repeating timer so you are not standing there pressing a button every twenty five seconds for two hours. Intervalometers are specifically documented as a way to drive the long and very long exposures night photography needs, and star trail stacking is named directly as a use case: "long and very long exposures taken at night can be combined to create time-lapse animations, including star trails" (Wikipedia's entry on intervalometers).
The setting that trips up almost everyone the first time is the gap between your interval and your actual exposure length. If you set a thirty second exposure, the camera's own processing can push the real capture time slightly past thirty seconds. If your interval is also set to exactly thirty seconds, the camera misses its next trigger because it is still busy finishing the previous frame, and you end up with dropped frames and visible gaps in your trail. Set your interval a couple of seconds longer than your exposure time to give the camera breathing room. Use an infinite shot count rather than a fixed number, since you want the freedom to stop the sequence whenever conditions change rather than running out of planned frames early or late.
| Setting | Typical starting point |
|---|---|
| Individual exposure length | 20 to 35 seconds |
| Interval between shots | 2 to 3 seconds longer than the exposure length |
| Shot count | Infinite, stop manually when you have enough |
| Long exposure noise reduction | Off |
| Autofocus | Off, locked manually on infinity |
| File format | RAW |
Managing dew, condensation, and batteries in the field
Nothing ends a star trail session faster than a fogged lens, and it rarely announces itself until you check your last few frames and realize the stars have been softening for twenty minutes. Dew forms whenever a surface cools below the surrounding air's dew point, the specific temperature at which relative humidity reaches one hundred percent (Wikipedia's entry on dew point explains the mechanism directly). A camera lens left outside for hours radiates heat and cools faster than the air around it, which is exactly why a lens can fog even on a night that does not feel humid.
A lens hood buys a little time by blocking some of that radiant heat loss, but on a multi-hour session in humid air it is rarely enough alone. Strap chemical hand warmers around the lens barrel with a rubber band, or use a dedicated electric dew heater band if you shoot night skies often enough to justify one. Both work by keeping the glass a few degrees above the air's dew point so condensation cannot form. Resist wiping a fogged lens mid-sequence; the fog usually returns within minutes unless you fix the underlying temperature difference.
Batteries are the other quiet failure point. Cold desert nights and hours of continuous shooting drain batteries far faster than a typical daytime session. Carry at least one spare, keep it in an inner jacket pocket rather than your camera bag so your body heat keeps it warm, and if you are stacking rather than running a single exposure, you can swap batteries between frames without technically breaking your sequence, one more reason stacking is the more forgiving method for long sessions.
Stacking workflow: StarStaX and the Photoshop alternative
Once you have your folder of individual frames, StarStaX is the purpose-built free tool most night photographers reach for first. Import your full sequence, choose a blend mode, Lighten for a straightforward trail, Gap Filling if a passing cloud or a removed frame leaves a visible break you want smoothed over, or Comet if you want each trail to fade like a tail rather than staying a uniform brightness, and let it process. The software handles the actual math of combining every frame's brightest pixels into one continuous trail, which is far faster than doing it by hand.
If you already live in Adobe's ecosystem, Photoshop can do the same job. Load your sequence as layers with File, Scripts, Load Files into Stack, select every layer, and set the blend mode to Lighten. Photoshop keeps only the brightest pixel at every point across all your frames, which is exactly how a star trail accumulates. It takes longer to set up than StarStaX and gives less fine control over blend style, but it is one less install if you already edit there.
This is also where stacking's real advantage over a single exposure shows up most clearly: if a plane or satellite streaked through frame 112 of your 300 frame sequence, you simply exclude that one layer before blending rather than losing the entire session to one bad frame.
Common mistakes
The mistakes that ruin star trail sessions are usually planning mistakes, not camera settings. Shooting toward a bright moon or a nearby town's light dome raises the sky's brightness floor and washes out fainter stars before your settings are the problem, since no filter fully substitutes for a genuinely dark sky (Wikipedia's entry on light pollution states this directly: "no filter can match the effectiveness of a dark sky"). Leaving long exposure noise reduction on during a stacked sequence is next, since it quietly doubles your effective time per frame and can introduce gaps. Forgetting to lock focus manually is the third, and it only shows up once you are home reviewing files.
Frequently asked questions about star trail photography
How long does it take to photograph star trails? A noticeable trail with a wide lens can show up in ten to thirty minutes. A strong, clearly circular result usually needs one to two hours, and a full dramatic arc typically comes from two to five hours, almost always stacked rather than one continuous exposure.
Can you photograph star trails with a smartphone? Yes, with a tripod or stable surface. Some phones include a native star trail mode, and third party apps can stack frames automatically. Battery life is usually the limiting factor.
Which direction should I point my camera for circular star trails? Toward your hemisphere's celestial pole. Pointing east or west instead gives long, nearly straight streaks, since you are capturing stars rising or setting rather than circling.
Single exposure or stacked exposures, which is better? Neither is universally better. A single exposure gives a simpler, more organic trail over a short session in genuinely dark, stable conditions. Stacking gives more control and recoverability over longer sessions, at the cost of needing an intervalometer and a stacking step afterward.
Do I need to find Polaris exactly, or just get close? Close is fine. Being slightly off just shifts where the circle's center sits in your frame.
How do I find the south celestial pole without a bright pole star? Use the Southern Cross: extend an imaginary line along its long axis roughly four and a half times its own length, then cross-check against the two bright Pointer stars, Alpha and Beta Centauri, since NASA confirms there is no bright star marking the pole itself the way Polaris does in the north.
What interval and exposure length should I use? Individual exposures of twenty to thirty five seconds are a common starting point, with your interval set two to three seconds longer than the exposure to avoid dropped frames, and an infinite shot count rather than a fixed number.
Should I turn off long exposure noise reduction and autofocus? Yes to both. In camera noise reduction can roughly double each frame's effective capture time in a stacked sequence, and autofocus will hunt uselessly in the dark and can shift focus between frames if left active.
How do I stop my lens from fogging up during a multi-hour session? Keep the glass warmer than the surrounding air's dew point. A lens hood helps briefly, but hand warmers strapped to the barrel or an electric dew heater band are the reliable fix for long sessions.
What software do I use to stack star trail images? StarStaX is the free, purpose-built option most night photographers reach for first. Photoshop's Load Files into Stack with a Lighten blend mode achieves a similar result if you already work in that ecosystem.
Will moonlight ruin my star trails? It raises the sky's overall brightness and can wash out fainter stars, but it does not necessarily ruin the shot. Stacking shorter, higher ISO frames generally handles moonlight better than one long exposure, which bakes the brightness in for the entire duration.
Where to shoot: dark sky deserts
Every technique in this guide depends on one thing you cannot fix with a filter or a setting: a genuinely dark sky. That is exactly why our Algeria Sahara Desert photo tour is built where it is. The itinerary runs seven days through the Djanet region, including nights camped among the red dunes of Erg Tin Merzouga, rising up to 600 meters, and the golden dunes of Erg Admer, with skies the tour itself describes as free from light pollution, exactly the condition every section of this guide has been building toward. You will not find a town's light dome washing out your trails, and the terrain gives you dramatic, uncluttered foregrounds, a dune ridge, a rock arch, a Neolithic engraving site, to anchor the circling stars around. If you have been reading this guide wondering where you would actually put a four hour stacked sequence to use, a desert this dark is the honest answer.
If you want the night sky technique chain from the beginning, our landscape photography pillar guide covers the full progression from blue hour through the Milky Way, and our piece on the 500 Rule vs the NPF Rule explains the exposure-length math you are deliberately working against once you decide to let stars trail instead of keeping them sharp. If you are weighing whether a motorized star tracker might serve you better than either method here, our guide to using a star tracker for landscape astrophotography covers that different, tracked-sky approach in full.
Sources
- NASA Science: What Is the North Star and How Do You Find It?
- U.S. National Park Service, Acadia: Night Skies Photography
- Wikipedia: Star trail
- Wikipedia: Circumpolar star
- Wikipedia: Polaris
- Wikipedia: Intervalometer
- Wikipedia: Dew point
- Wikipedia: Light pollution